Sacreva Documention

This documentation will provide you all the details you need to use the Sacreva theme and understanding of how Sacreva is structured and guide you in performing the most common features. If you require further assistance, related to topics not covered in this documentation, then please contact us via our support forum.

We assume that you already have WordPress installed and ready to go. If you do not, please see our section on WordPress to help you get started.

screenshot Sacreva

WordPress Instructions

To use this theme you need a working version of WordPress already installed on your server or the local environment. We have given the documentation links, where you will find the requirements and the other details about WordPress.

Theme Requirements

To use the Sacreva theme you need the latest version of the WordPress, PHP Version 7 or higher, and MySQL 5 or higher. Apart from the necessary WordPress requirements here are listed recommended server configuration requirements to make the theme work properly.

  • PHP – Version 7.2 or higher
  • MySQL – Version 5.6 or higher ( OR MariaDB version 10.1 or higher)
  • memory_limit – 128M or higher
  • max_execution_time – 180 or higher
  • upload_max_filesize – 32M or higher
If you are not sure about the server requirements here is the quick guide on how you can easily change the server requirements. Changing server requirements. We still prefer contact your server provider for this.

What’s Included

In the ThemeForest files we providing the theme files, required plugins for the theme, the documentation for this theme along with the child theme so you can customization in theme without changing the actual code.

Free Support

Support is limited to questions regarding the theme’s features or problems with the theme. We are not able to provide support for code customizations or third-party plugins. If you need help with anything other than minor customizations of your theme then you should enlist the help of a developer.

Theme Installation

We assume that the WordPress website is set, Now the next step is to install the theme. To get started with theme installation you’ll need to download the theme file. To download the theme file, go to ThemeForest Downloads and locate the theme. Click the download button to see the two options. The Main Files and the Installable WordPress Theme, here The Main Files contains all the files including the documentation, child theme, and plugins, and another option contains the theme zip file. Select the “Installable WordPress file only.” It will download the WordPress theme zip file for the theme.

There are three ways to install the theme in you wordpress environment you can use any of them to install theme.

  • Envato Market Plugin – You can use the envato market plugin for this.
  • FTP Client – You can use the FTP Client for this.
  • Through WordPress – You can install it directly using the WordPress theme installation.

Envato Market Plugin

This plugin helps customers receive updates to their premium Themes & Plugins purchased through Envato Market (ThemeForest & CodeCanyon). In this method, you can install the theme directly from Themeforest with the Envato Market plugin.

Follow the steps below to install via WordPress.

Step 1 – Download the ZIP file from here.

Step 2 – Login to your WordPress Dashboard

Step 3 – Go to Plugins > Add New

Step 4 – Click “Upload Plugin” at the top.

Step 5 – Upload the envato-market.zip file.

Step 6 – Once installed, click “Activate Plugin”

Step 7 – Visit the new “Envato Market” menu item

Step 8 – The plugin Settings Page allows you to configure your Envato API Personal Token. This API Token is generated from build.envato.com and will allow WordPress to securely receive item updates. 

Step 8 – Copy your token code and paste into the Token field on the Envato Market plugin page then Save Changes. Once token saved, you will able to see all of your purchases. Just click the Install button to install your theme.

FTP Installation

Follow the steps below to install via FTP.

Step 1 – Log into your web server with FTP client software

Step 2 – Unzip the Sacreva.zip file and ONLY use the extracted Sacreva theme folder

Step 3 – Upload the extracted theme folder into wp-content > themes folder

Step 4 – To Activate the newly installed theme. Go to Appearance > Themes and activate it.

WordPress Installation

Follow the steps below to install via WordPress.

Step 1 – Navigate to Appearance > Themes.

Step 2 – Click Install Themes and hit the upload button.

Step 3 – Navigate to find the “Sacreva.zip” file on your systen and click “Install Now”

Step 4 – Activate the newly installed theme. Go to Appearance > Themes and activate it.

Welcome Page

After activate theme you will be redirect to Sacreva Welcome page. Here you will have all the details about server configuration and theme and plugin info.

1 – Welcome Page.

In Welcome tab all the details about server configuration are available. Maker sure your server configuration should matches the theme config requirements to import demo data without error.

2 – Recommended Plugins.

In Recommeneded plugins tab all the additional plugin list which are compatible with sacreva available here.

3 - ADDONS

In addons all the additional required plugins list which are using in theme will be there.

4 - Docs

In Docs tab online theme documentation link is avaialble


Demo Content

Before you start importing the demo content make sure you have installed all the required plugins for the theme so that demo content import properly. Here is the plugin list that you need to install and active before you start import. You will find them in ( Appearance > Install Plugins )

  • Slider Revolution
  • Elementor
  • WPBakery Page Builder
  • Sigma Core
  • Redux Framework
  • One Click Demo Import
  • Contact Form 7
  • MC4WP (Mailchimp for WP)
  • Woocommerce
  • YITH Woocommerce Wishlist
  • YITH Woocommerce Quickview
  • YITH Color and Label Variations for WooCommerce
  • Give - Donation Plugin
  • Real 3D Flipbook
  • Book Shelf
  • Custom Twitter Feeds
  • Hotel Booking

Now for the demo import, you have to go to the ( Appearance > Import Demo Data ). Now click on the import button and again click on Continue & Import wait for some time your demo will be ready in a few minutes.

Please Note Some Important Items About The Demo Content

  • Images – Our demo images are not included because those are license stock photos that are not allowed to be shared. Instead we include dummy images.
  • Theme Options – Once the demo imporetd we recommend to save the theme options.

Import Demo Data for Real3d Flipbook and Bookshelves

After imported the default content of theme using One Click Demo Import(mentioned above) install content for Flipbook and Bookshelves Plugin. To import Flipbook and Shelves data import the data file from package available in Flipbook and Flipbook Shelves folder

Now to import demo copy the content from json file and go to Dashboard > Real3D Flipbook > Flipbook now paste the content into import flipbook content field. Shelves can be imported in ShelvesTab


To Import Shelves

Page Settings

Page Templates

We have created the page template for the full-width layout which means there will be no sidebar for these pages. This will be helpful in creating the page as you like using the Shortcodes. you will find the full width layout here ( Page Attributes > Template > Full width )


Custom Page Layout - Using this option you can create custom header and footer on any page. It will be different from theme option on changing options.

Disable Page Subheader - Enable this option to disable subheaer on specific page

Custom Title - Enter custom subheader title here

Custom Subtitle - Enter custom subheader subtitle here

Sidebar Position - Select custom sidebar position for specific page.

Box Layout - Select the page layout (Full Width or Container)

Custom Subheader Image - Add custom image to show into subheader of a page.

Some pages like home pages do not need page title which contains the Title of the page and the Breadcrumb, we have provided the settings for this where the user can disable the page title for the individual page. For that you just have to mark the settings in ( Page Settings > Disable Page Title )

Volunteer Settings

Volunteer settings contain a useful field for the volunteer member, You can set the general details like a phone number, designation, emails with the social profiles. Which will be visible in shortcodes.

1. Volunteer Title

2. Volunteer Description

3. Volunteer Short Info

4. Volunteer Additional Info

5. Volunteer Image

Testimonial Settings

Testimonial Settings contain a useful field for the testimonial, You can set the general details Which will be visible in shortcodes.

Stories Settings

Using stories settings you can set the Client Name, Project name, Project Submit Date etc. That will be useful in representing the stories shortcode.

1. Stories Title

2. Stories Content

3. Stories Short Description

4. Stories Categories

5. Stories Meta Details

6. Stories Image

Service Settings

Using Service settings you can set the short description for the Service with the icons, that will be useful in representing the Service shortcode. Along with you can show call to action on service details page. Using Call To Action option in each service meta fields

Events Settings

Using Events settings you can set the Event with meta details like: Event start date, end date, location, organizer and event authors.

1. Event Title

2. Event Content

3. Event Short Description

4. Event Meta Details

5. Event Categories

6. Event Tags

7. Event Image

Philosophy Settings

Using Philosophy settings you can set the philosophy with meta details like: Philosophy start date, end date, location, organizer and philosophy authors.

1. Philosophy Title

2. Philosophy Content

3. Philosophy Short Description

4. Philosophy Meta Details

5. Philosophy Categories

6. Philosophy Tags

7. Philosophy Image

Sermons Settings

Using Sermons settings you can add sermons with audio, video, pdf details.

1. Sermons Title

2. Sermons Content

3. Sermons Short Description

4. Sermons Meta Details

5. Sermons Categories

6. Sermons Image

Buddhism Settings

Using Buddhism settings you can add buddhism with audio, video, pdf details.

1. Buddhism Title

2. Buddhism Content

3. Buddhism Short Description

4. Buddhism Meta Details

5. Buddhism Categories

6. Buddhism Image

Holis Settings

Using Holis settings you can add holis with audio, video, pdf details.

1. Holis Title

2. Holis Content

3. Holis Short Description

4. Holis Meta Details

5. Holis Categories

6. Holis Image

Ministries Settings

Using Ministries settings you can add ministry with name, date and category type.

1. Ministries Title

2. Ministries Content

3. Ministries Short Description

4. Ministries Categories

5. Ministries Meta Details

6. Ministries Image

Community Settings

Using Community settings you can add community with name, date and category type.

1. Community Title

2. Community Content

3. Community Short Description

4. Community Categories

5. Community Meta Details

6. Community Image

Puja Settings

Using Puja settings you can add puja with name, date and category type.

1. Puja Title

2. Puja Content

3. Puja Short Description

4. Puja Categories

5. Puja Meta Details

6. Puja Image

Prayer Settings

Using Prayer settings you can add prayer verses.

1. Prayer Title

2. Prayer Content

3. Prayer Short Description

4. Prayer Tags

5. Prayer Categories

Donations Settings

Using Donations settings you can add donation form with donation goal value.

1. Donation Form Title

2. Donation Form Content (Here you can manage donation goals, donation price, donation meta and content)

3. Donation Form Image

Theme Layout

Using the Theme Layout settings theme options you can manage the theme layouts, content size, bacground body color/image , Mobile View Enable Back to Top , Enable Preloader , Enable Retina Display, Retina Multiplier.

Content Size – You can change the default size for the content.

Website Body Background color/image – Set the body background color/image image using this option.

Enable Preloader – You can enable/disable preloader.

Enable Back to Top – Enable/Disable back to top.

Enable Retina Display – Enable this option to set Retina Multiplier for images.

Retina Multiplier – You can set the Retina Multiplier.

Typography

Using the page settings, you can manage the page sidebar position here.

Custom Heading Title Font – Here you can manage the typography for Custom heading shortcode title.

Custom Heading Subtitle Font – Here you can manage the typography for Custom heading shortcode subtitle.

Body Font – You can manage the typography for body.

H1 Headers Typography – Here you can manage the typography for H1 tag.

H2 Headers Typography – Here you can manage the typography for H2 tag.

H3 Headers Typography – Here you can manage the typography for H3 tag.

H4 Headers Typography – Here you can manage the typography for H4 tag.

H5 Headers Typography – Here you can manage the typography for H5 tag.

H6 Headers Typography – Here you can manage the typography for H6 tag.

Color Scheme

Here you manage the color option for the theme.

Primary Color – You can select the primary color for the theme.

Secondary Color – You can select the secondary color for the theme.

Tertiary Color – You can select the tertiary color for the theme.

Contact Information

This section contains the contact and scocial related informations.

Company Email – You can set the email here.

Company Phone Number – You can set phone number here.

Company Address – Set the the address here.

Company Google map link – Please enter google maps link.

Company Description – Please type a small description of your company.

Social info – Using these settings you can manage the social icons with the URL, you also can manage the order for them.

Header Settings

Using the Header settings theme options you can manage the header layouts, search optionm, button and the logo.

Select Header Layout – You can change the header layout using this settings.

Display Call to Action Button – You can enable/diable call to action button for main header.

Call to Action Button Title – Set the title for Call To Action button.

Call to Action Button link – Set the link for Call to Action Button.

Select Header Color scheme – Set Select Header Color scheme using this options.

Select Header Position – You can Select Header Position as well.

Set Custom Header Width – You can Set Custom Header Width.

Enable sticky header – You can Enable sticky header.

Select Sticky Header Color scheme – You can Select Sticky Header Color scheme.

Header sticky background color – You can Header sticky background color.

Header sticky color – You can Header sticky color.

Header sticky color on hover – You can Header sticky color on hover.

Display Top Menu – You can Display Top Menu in header.

Display Search – You can Display Search.

Display Cart – You can Display Cart icon.

Display Wishlist – You can Display Wishlist icon.

Display Livestream Status – You can Display Livestream status in header.

Display Prayer icon – You can prayer icon which will redirect on prayer archive page.

Display collapse sidebar – You can Display collapse sidebar.

Header bottom background color – You can Header bottom background color.

Header bottom color – You can Header bottom color.

Header bottom color on hover – You can Header bottom color on hover.

Header Submenu background color – You can Header Submenu background color.

Header Submenu color – You can Header Submenu color.

Header Submenu color on hover – You can Header Submenu color on hover.

Header Logo Settings

Using the Header settings theme options you can manage the Header logo and Logo Info Card

Site Logo – You can change the header Header logo, using this settings.

Sticky Logo – Will display a secondary logo when header is sticky and scrolling the page. ONLY available if you have Sticky Header enabled in Header settings.

Logo Text link options – Specify the logo typography properties. Will only work if you don't upload a logo image.

Display Info Card – Please choose if you want to display the info card or not.

Header Top Settings

Header Top Settings only will work for Header style 1, 2 and 5

Using the Header settings theme options you can manage the Header Top Settings search optionm, button and the logo.

Display Top Header – Please choose if you want to display the top header or not.

Display Top Header Social Media – Please choose if you want to display the top header social media links or not.

Header top background color – Set background color for the top header.

Header top color – Set color for the top header.

Header top color on hover – Set color on hover for the top header.

Subheader Settings

Subheader title settings contain the page title and the breadcrumb, you can enable/disable them, you can also set the background for the page title section and the height of the section.

Subheader – Enable/disable the subheader (For All Pages).

Page Title Alignment – Set alignment for the subheader title.

Page Title Pattern – Set pattern for for the subheader

Subheader Height – You can set height for subheader.

Display Breadcrumb ? – Enable/disable breadcrumb.

Breadcrumb Position – Select Breadcrumb position. (Inline/Before Title/After Title/Below Image)

Background Image – Using this setting you can set the background for subheader.

Subheader Caption – Using this setting you can show custom caption under page title in subheader.

Background Opacity Color – Using this setting you can set the background opacity color.

Subheader Padding – Using this setting you can set the custom padding for subheader.

Blog Settings

Using the blog settings, you can manage the blog sidebar and the social share for the blog.

Select Blog Style – You can Please select the blog style to display.

Number of Columns – You can please select the number of columns in blog archive.

Blog Sidebar – You can select the sidebar position for the blog.

Show Post Author box in sidebar – You can please select Show Post Author box in sidebar.

Social Share – You can enable/disable different social sharing option .

Gallery post format images – Enter no of gallery images attachments in post format gallery. .

Select Audio Format Style – Please select the audio format sytle for post.

Page Settings

Using the page settings, you can manage the page sidebar position here.

Page Sidebar – You can select the sidebar position for the page.

Button Settings

Using the button settings, you can manage the button style here.

Select Button Style – You can select the Select Button Style for the template.

Custom Post Types Settings

Using the custom post type settings, you can manage the custom post types available in the theme. Just Drag/Move the custom post type field in disbable to remove the custom post type from theme and vice versa.

As you can see the right side image the Philosophy custom post type is moved in disabled option. And now philosophy custom post type will not appear in theme dashboard.

Stories Settings

Using the stories settings, you can manage the page sidebar position here.

Stories Sidebar – You can select the sidebar position for single stories page.

Select Stories Style – You can select the Select Stories Style for single stories page.

Number of Columns – You can select the Number of Columns for single stories page.

Volunteer Settings

Using the volunteer settings, you can manage the Volunteer page here.

Select Volunteer Style – Please select the volunteer archive style to display.

Number of Columns – Please select the number of columns in volunteer archive.

Service Settings

Using the Service settings, you can manage the Service page here.

Service Sidebar – Please Select the service sidebar position.

Select Service Style – Please select the Service archive style to display.

Number of Columns – Please select the number of columns in Service archive.

Ministries Settings

Using the Ministries settings, you can manage the Ministries archive page here.

Ministries Sidebar – Please Select the Ministries sidebar position.

Select Ministries Style – Please select the Ministries archive style to display.

Number of Columns – Please select the number of columns in Ministries archive.

Show Ministries Excerpt – Enable to show ministries content and enter number of words to show in Ministries archive content.

Show Ministries Info – Enable to show ministries meta info on details page.

Show Ministries Share – Enable to show ministries social share on details page.

Sermons Settings

Using the Sermons settings, you can manage the Sermons archive page here.

Sermons Sidebar – Please Select the Sermons sidebar position.

Select Sermons Style – Please select the Sermons archive style to display.

Number of Columns – Please select the number of columns in Sermons archive.

Show Sermon Featured Image – Enable to show sermons featured image on archive

Show Sermon Audio Link – Enable to show sermons audio meta info and select audio player style.

Show Sermon Video Link – Enable to show sermons video link.

Show Sermon PDF Link – Enable to show sermons PDF link.

Show Sermons Info – Enable to show Sermons meta info on details page.

Show Sermons Share – Enable to show Sermons social share on details page.

Events Settings

Using the Events settings, you can manage the Events archive page here.

Events Sidebar – Please Select the Events sidebar position.

Select Events Style – Please select the Events archive style to display.

Number of Columns – Please select the number of columns in Events archive.

Show Events Date – Enable to show event date

Show Events Excerpt – Enable to show Events content and enter number of words to show in Events archive content.

Show Events Time – Enable to show event time

Show Events Location – Enable to show event location

Events Details Sidebar – Please Select the Events details sidebar position.

Show Events Details Meta Info – Enable to show events meta info details.

Show Events Speakers – Enable to show events Speakers.

Community Settings

Using the Community settings, you can manage the Community archive page here.

Community Sidebar – Please Select the Community sidebar position.

Select Community Style – Please select the Community archive style to display.

Number of Columns – Please select the number of columns in Community archive.

Show Community Excerpt – Enable to show community content and enter number of words to show in Community archive content.

Show Community Info – Enable to show community meta info on details page.

Show Community Share – Enable to show community social share on details page.

Buddhism Settings

Using the Buddhism settings, you can manage the Buddhism archive page here.

Buddhism Sidebar – Please Select the Buddhism sidebar position.

Select Buddhism Style – Please select the Buddhism archive style to display.

Number of Columns – Please select the number of columns in Buddhism archive.

Show Buddhism Featured Image – Enable to show buddhism featured image on archive

Show Buddhism Audio Link – Enable to show buddhism audio meta info and select audio player style.

Show Buddhism Video Link – Enable to show buddhism video link.

Show Buddhism PDF Link – Enable to show buddhism PDF link.

Show Buddhism Info – Enable to show Buddhism meta info on details page.

Show Buddhism Share – Enable to show Buddhism social share on details page.

Philosophy Settings

Using the Philosophy settings, you can manage the Philosophy archive page here.

Philosophy Sidebar – Please Select the Philosophy sidebar position.

Select Philosophy Style – Please select the Philosophy archive style to display.

Number of Columns – Please select the number of columns in PHilosophy archive.

Show Philosophy Date – Enable to show philosophy date

Show Philosophy Excerpt – Enable to show Philosophy content and enter number of words to show in Philosophy archive content.

Show Philosophy Time – Enable to show philosophy time

Show Philosophy Location – Enable to show philosophy location

Philosophy Details Sidebar – Please Select the Philosophy details sidebar position.

Show Philosophy Details Meta Info – Enable to show philosophy meta info details.

Show Philosophy Speakers – Enable to show philosophy Speakers.

Puja Settings

Using the Puja settings, you can manage the Puja archive page here.

Puja Sidebar – Please Select the Puja sidebar position.

Select Puja Style – Please select the Puja archive style to display.

Number of Columns – Please select the number of columns in Puja archive.

Show Puja Excerpt – Enable to show puja content and enter number of words to show in Puja archive content.

Show Puja Info – Enable to show puja meta info on details page.

Show Puja Share – Enable to show puja social share on details page.

Holis Settings

Using the Holis settings, you can manage the Holis archive page here.

Holis Sidebar – Please Select the Holis sidebar position.

Select Holis Style – Please select the Holis archive style to display.

Number of Columns – Please select the number of columns in Holis archive.

Show Holis Featured Image – Enable to show holis featured image on archive

Show Holis Audio Link – Enable to show holis audio meta info and select audio player style.

Show Holis Video Link – Enable to show holis video link.

Show Holis PDF Link – Enable to show holis PDF link.

Show Holis Info – Enable to show Holis meta info on details page.

Show Holis Share – Enable to show Holis social share on details page.

Rooms Settings

Using the Prayer settings, you can manage the Prayer page here.

Prayer Sidebar – Please Select the prayer archive sidebar position.

Select Prayer Style – Please select the Prayer archive style to display.

Number of Columns – Please select the number of columns in Prayer archive.

Prayer Settings

Using the Prayer settings, you can manage the Prayer page here.

Prayer Sidebar – Please Select the prayer archive sidebar position.

Select Prayer Style – Please select the Prayer archive style to display.

Number of Columns – Please select the number of columns in Prayer archive.

Donation Settings

Using the Donations settings, you can manage the Donations page here.

Donations Sidebar – Please Select the prayer archive sidebar position.

Select Donations Style – Please select the Donations archive style to display.

Number of Columns – Please select the number of columns in Donations archive.

Google Settings

Using the Google Settings, you can manage the Google Settings here.

Google Analytics – Enter your Google Analytics tracking code here.

Google Tag Manager – Enter your Google Tag Manager tracking code here.

Google Web Master Tools – Enter your Google Web Master Tools tag here.

WooCommerce settings

Using the WooCommerce settings, you can manage the Shop Layout here.

Shop Layout – Enter your Shop Layout here.

Product Archive settings

Using the Product settings, you can manage the Shop archive products.

Product card style – Select products card style for shop archive page.

Show featured badge? – Show/Hide featured badge on featured products.

Show sale badge? – Show/Hide sale badge for the proudcts which is on sale.

Show Excerpt? – Enable/Disable product excerpt with excerpt length option.

Show Notification On added to cart – Enable this option to show Notification popup while you added a product into cart.

Show Woo Product Compare Button? – Enable this option to show custom compare button for woocommerce products.

Select Compare Page – Select a page for compare table. It should contain the shortcode: [sigma_base_compare]

Select Compare Fields – Using this option you can select which fields should be presented on the product compare page with table.

Show Notification On added to compare – Check if you want to show a notification popup when a user adds an item to the compare..

Product Details settings

Using the Product Details settings, you can manage the product page.

Select First Variation by default – Check if you want to select the first variation in variable products by default (This overrites the WooCoomerce option on a product level).

Display Product Social Share Enable this option to display the social share for products

Display Payment Method Enable this option to display payment method details under product share

404 Page

Using this settings you can manage the 404 page for the theme.

Page Title – You can set the 404 page title here.

Page Description – You can set the 404 page description here.

404 Background – Using this setting you can background option.

Back to Home – Enable/disable back to home button for the 404 page.

Rewrite Rules Settings

Using the rewrite rules you can change the slug of any custom post types provided win>th sacreva.

To change slug of any custom post type add slug name in the field of custom post type you want to change. Ex: add portfolio in Stories field to change the slug of stories custom post type.

Additional Settings

Using the Additional Settings, you can manage the Custom Css here.

Custom CSS – Enter your Custom css here.

Custom Javascript – Enter your Custom javascript here.

Import Options

Using the Import/Export Options settings, you can manage Import/Export Options here.

Import Options – Import Options here.

Export Options – Here you can copy/download your current option settings. Keep this safe as you can use it as a backup should anything go wrong, or you can use it to restore your settings on this site (or any other site).

Elementor Shortcodes/Widgets

We have created the many shortcodes/widgets so that you can create the page as per your requirements. Every shortcode contains a different perspective and the features to make the page dynamic. You will find the shortcode in left side panel after enable Edit with Elementor in page. These shortcodes have different fields for the facility. You also can make changes in the shortcode by extending them and overriding the shortcode template in the theme. Below are the shortcode that you will find in the theme:


Category: Sigma Core
  • SC: Stories - Show stories Items
  • SC: Counter - Show a counter
  • SC: Testimonials - Show testimonials
  • SC: Progress Bar - Display round or linear progress bar
  • SC: Infobox - Displays icon with title and text
  • SC: Video - Display a popup video
  • SC: Custom Tabs - Add tabbed content
  • SC: Blog - Display your blog posts
  • SC: Heading - Display section titles
  • SC: List - Add a list, with or without icons
  • SC: Gallery - Display your gallery
  • SC: Custom Images - Display your custom image
  • SC: Service - Show Services Items
  • SC: Call to action - Display call to action
  • SC: Basic Carousel - Display content in a unique slider
  • SC: History - Display history with steps
  • SC: Contact Form - Display contact info with custom form
  • SC: Buton - Dispaly button with theme style
  • SC: FAQ - Dispaly list of FAQ
  • SC: Products - Show Woocommerce Product Items
  • SC: Volunteer - Show Volunteer List
  • SC: Philosophy - Show Philosophy Items
  • SC: Single Philosophy - Show Single Philosophy Item
  • SC: Volunteer - Show Volunteer List
  • SC: Event - Show Event Items
  • SC: Single Event - Show Single Event Item
  • SC: Single Event - Show Single Event Item
  • SC: Prayer - Show Prayer verses List
  • SC: Ministries - Show Ministries Items
  • SC: Community - Show Community Items
  • SC: Puja - Show Puja Items
  • SC: Sermons - Show Sermons List
  • SC: Buddhism - Show Buddhism List
  • SC: Holis - Show Holis List
  • SC: Megamenu Menu - Show Megamenu Menu Items
  • SC: Megamenu Tab - Show Megamenu Tab
  • SC: Testimonial Slider - Show Testimonial Items in slider layout
  • SC: Timetable - Show Time table for events
  • SC: Custom Tabs - This shortcode will Use this shortcode to show custom tabs
  • SC: Youtube Broadcast – This shortcode will Use this shortcode to show live youtube video (Header livestream staus will depend on this shortocde channel link).
  • SC: Youtube Playlist – Using this shortcode you can show playlist of any channel.
  • SC: Donation - This shortcode will Use this shortcode to show give donation with different styles and layouts.

Note: some shortcodes will have Layouts option, meaning you can select to style it in either a Grid layout,Slider layout, or Isotope layout. Examples of such shortcodes is: Blog, service or stories

Wp Bakery Shortcodes

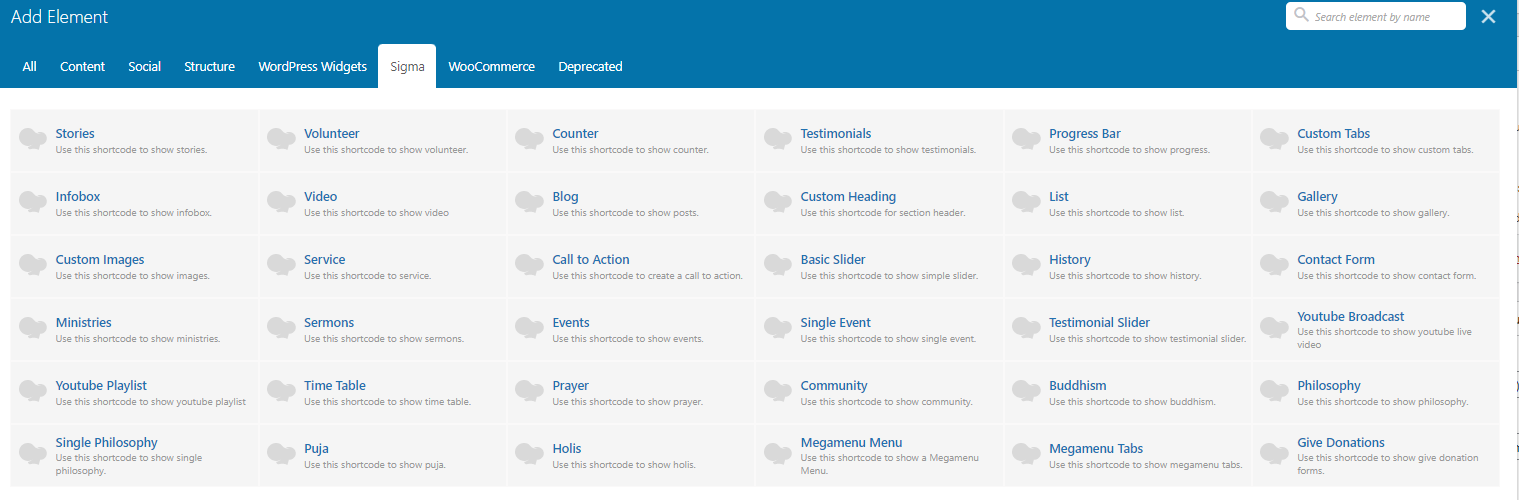
We have created the many shortcodes so that you can create the page as per your requirements. Every shortcode contains a different perspective and the features to make the page dynamic. You will find the shortcode in ( Pages > Add Element > Sigma ). These shortcodes have different fields for the facility. You also can make changes in the shortcode by extending them and overriding the shortcode template in the theme.

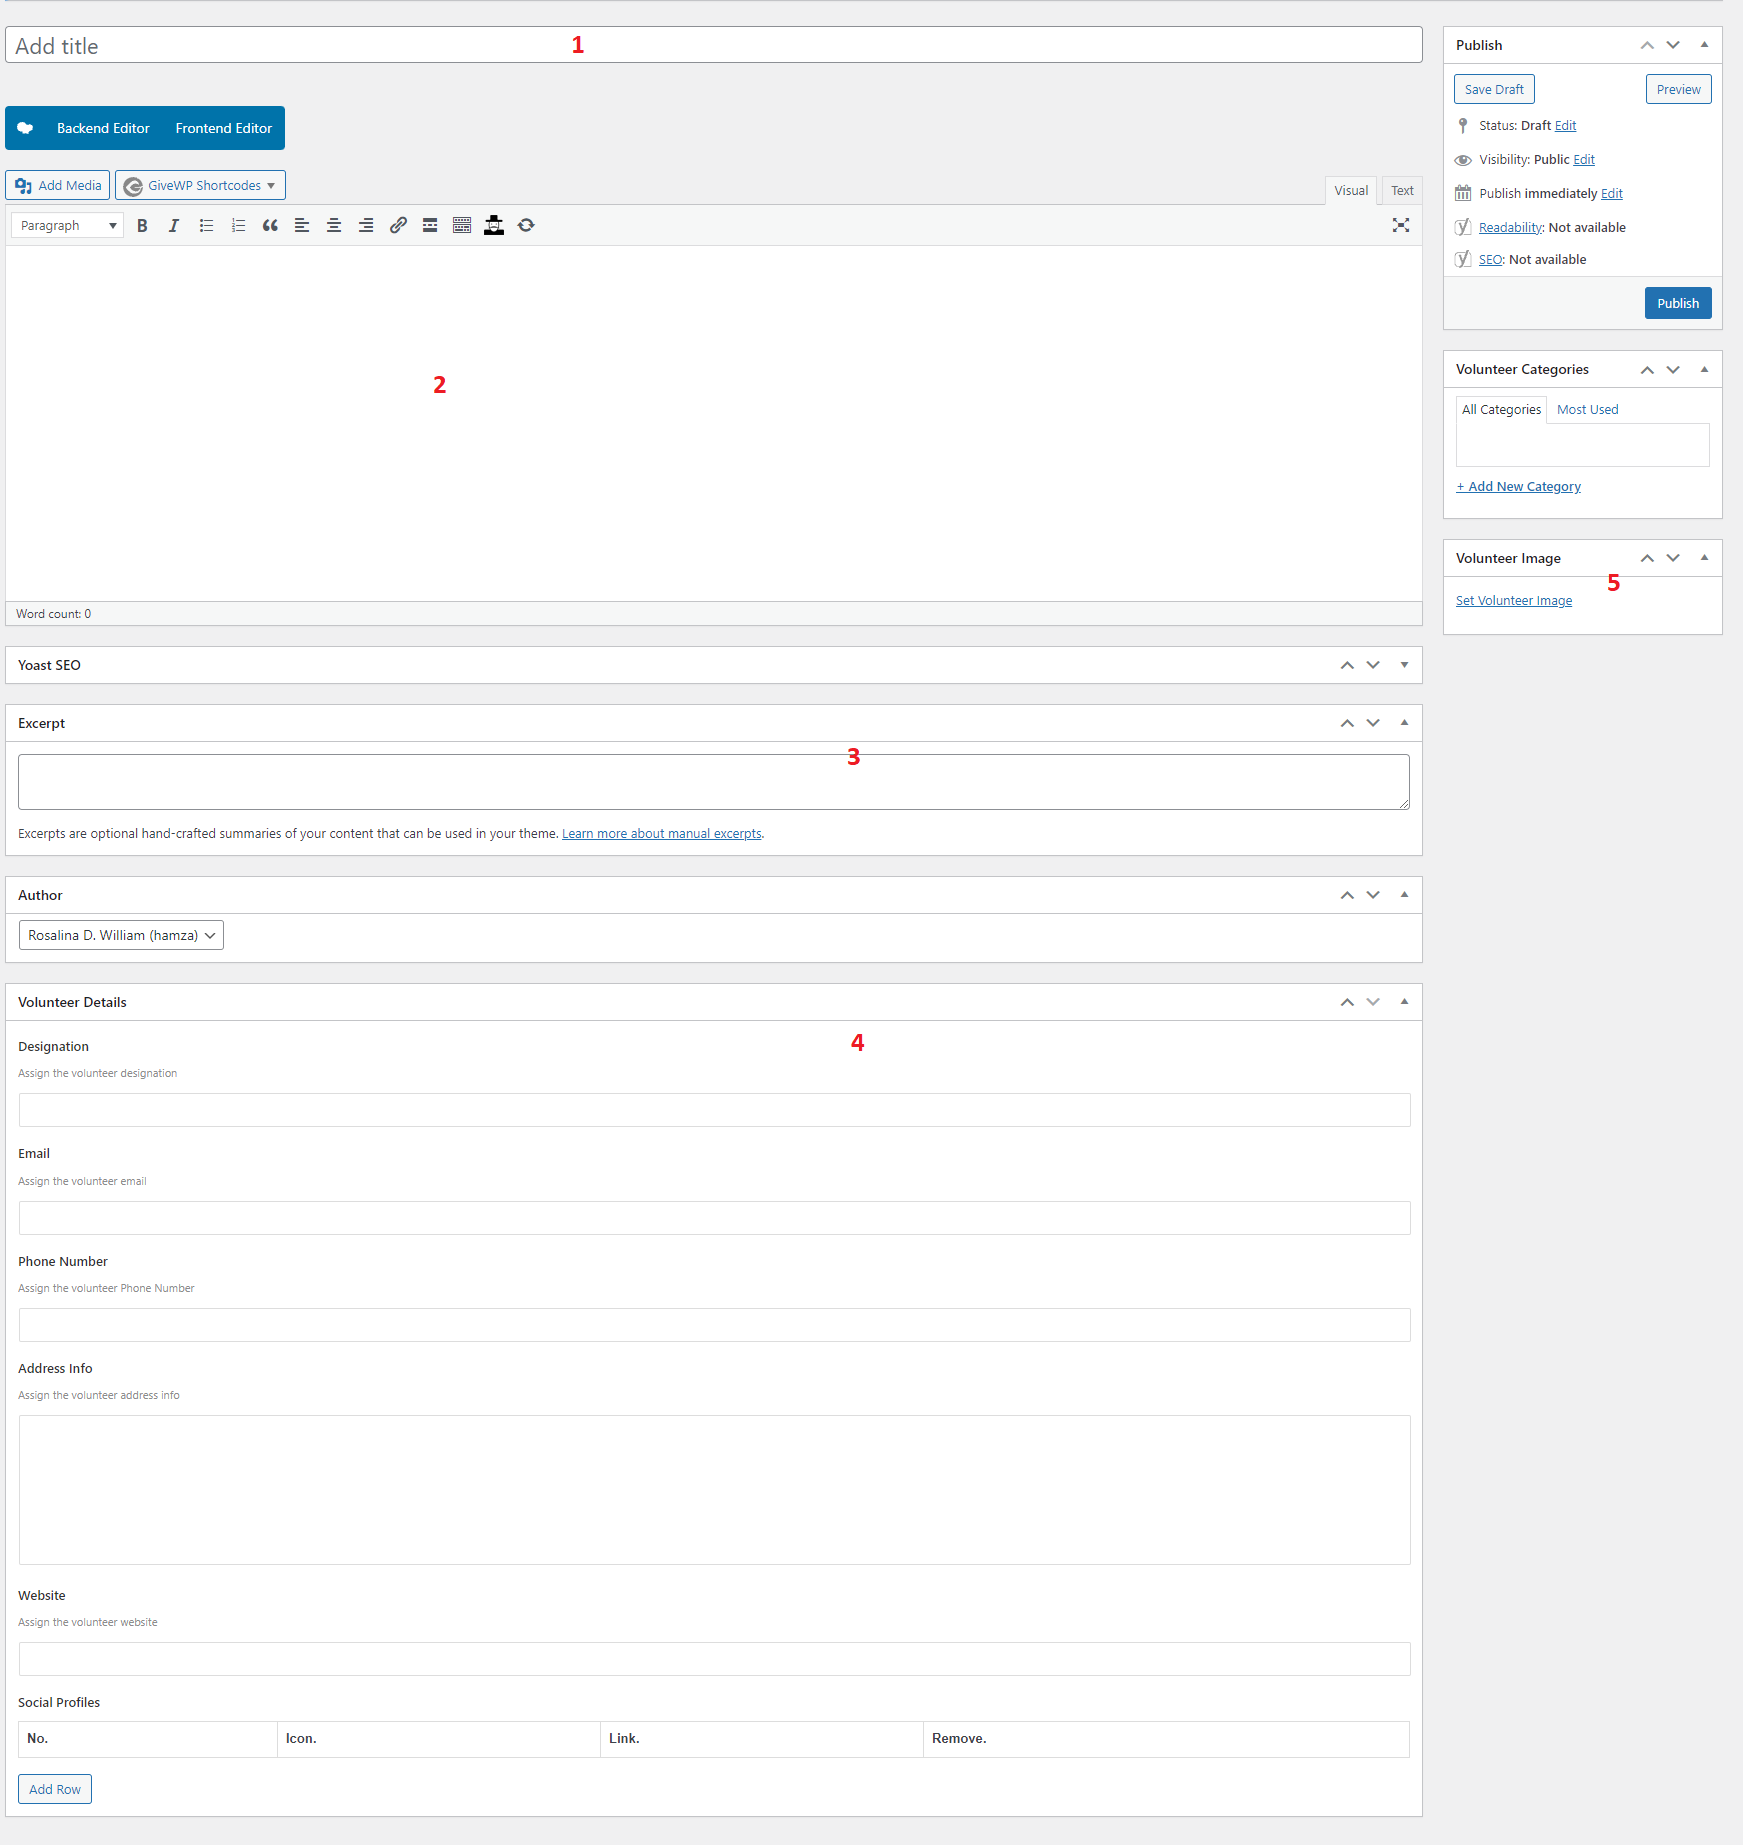
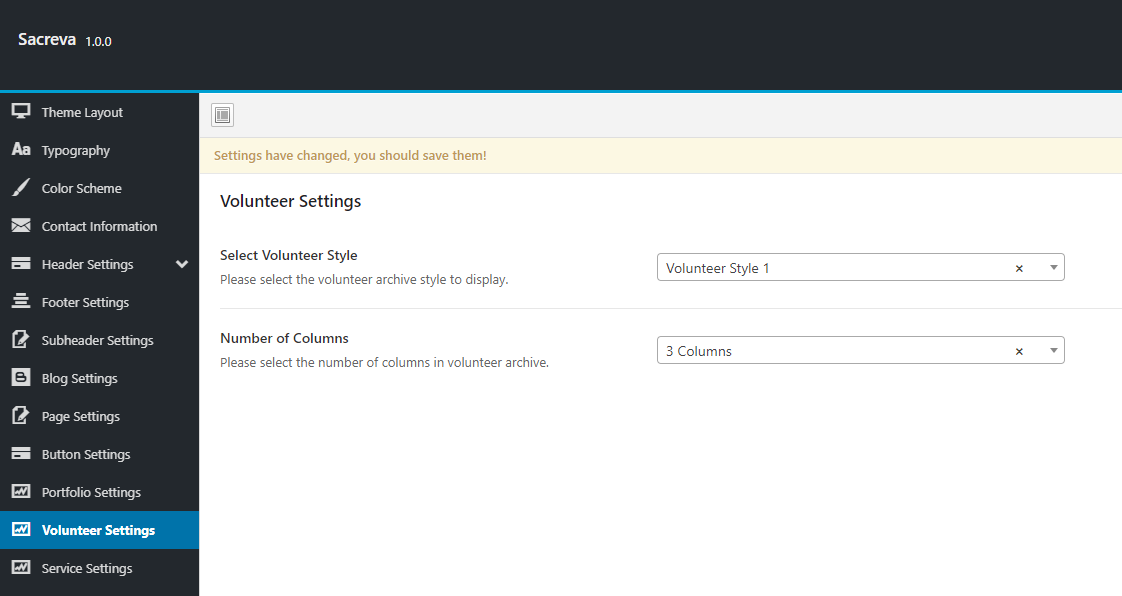
Volunteer – This shortcode will show the list of the volunteer members with the different layouts and settings.

Counter – This shortcode will show the counter based on the value you gave with the different layouts.

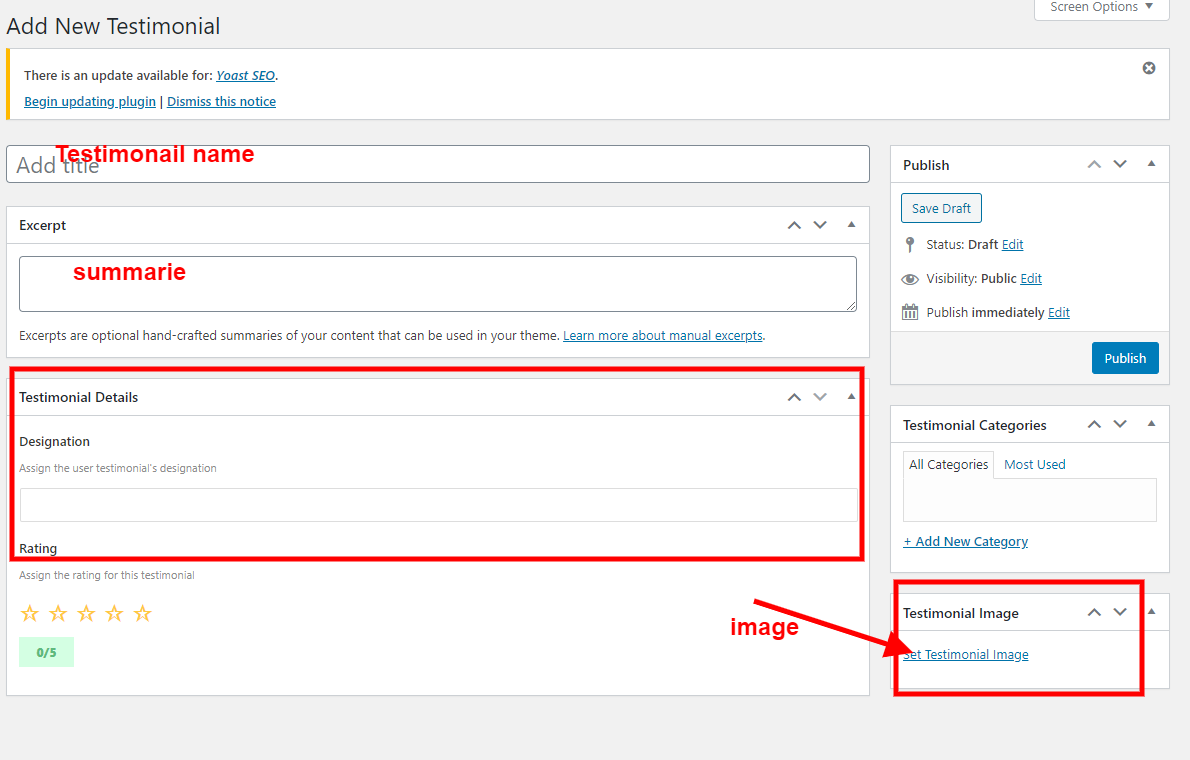
Testimonial– This shortcode will show the list of the testimonial with the different layouts and settings.

Progress Bar– This shortcode will show the progress bar based on the input values.

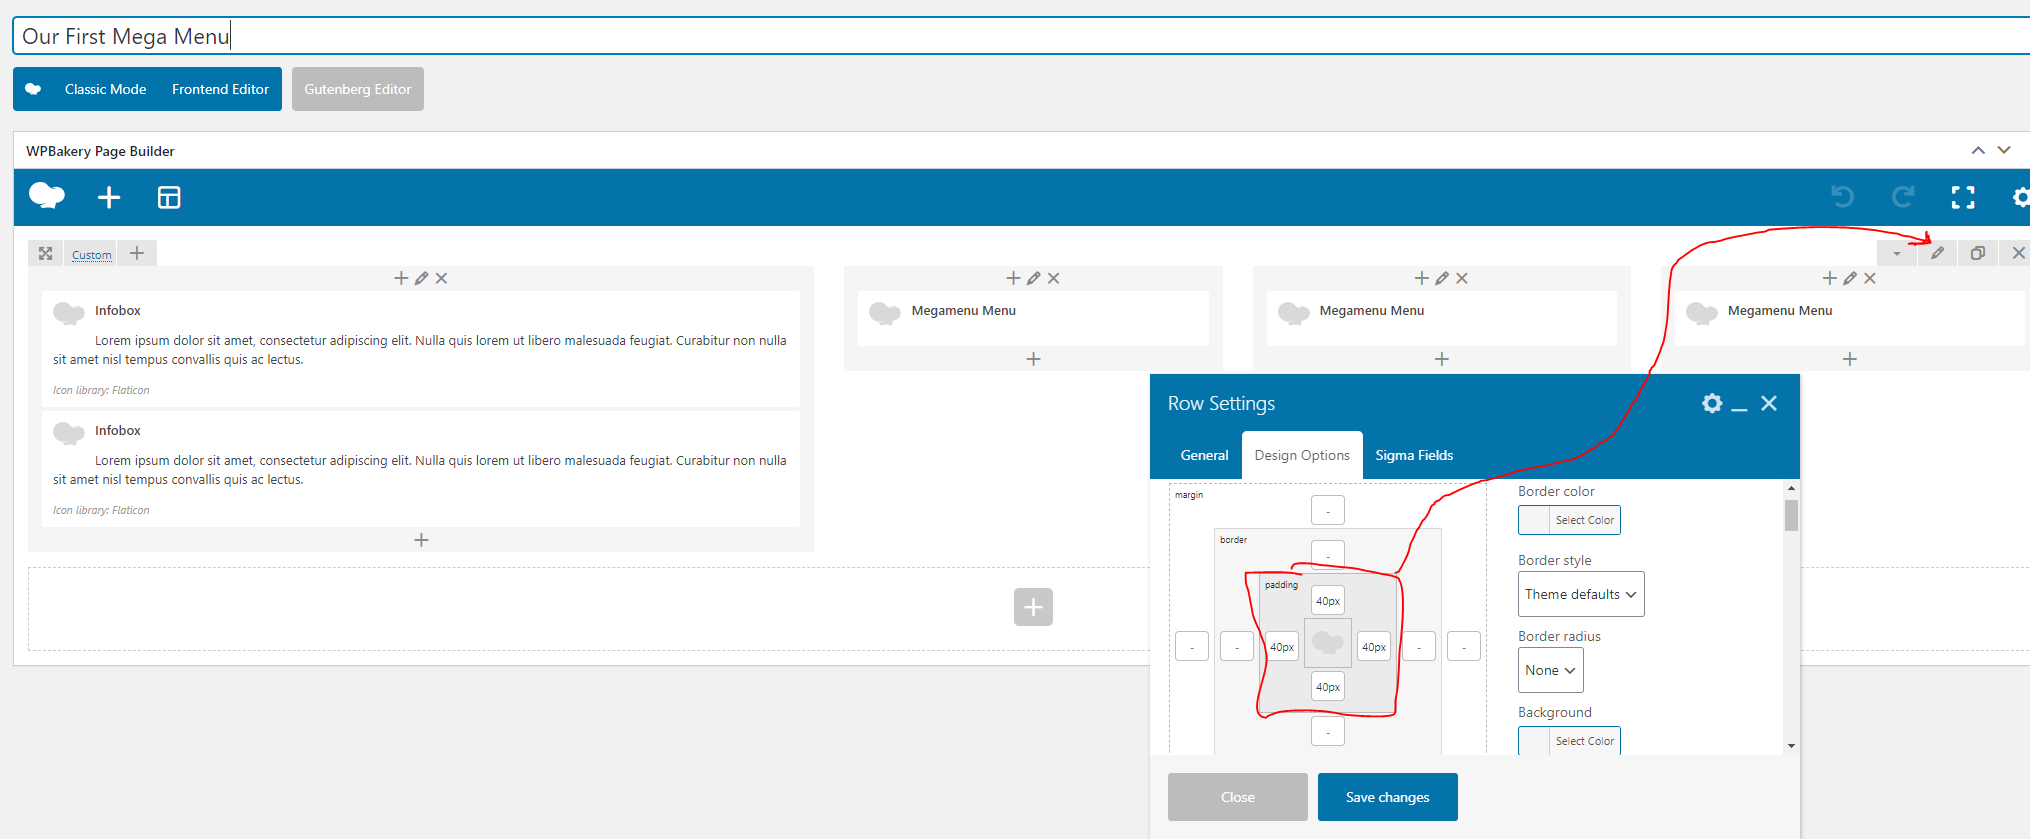
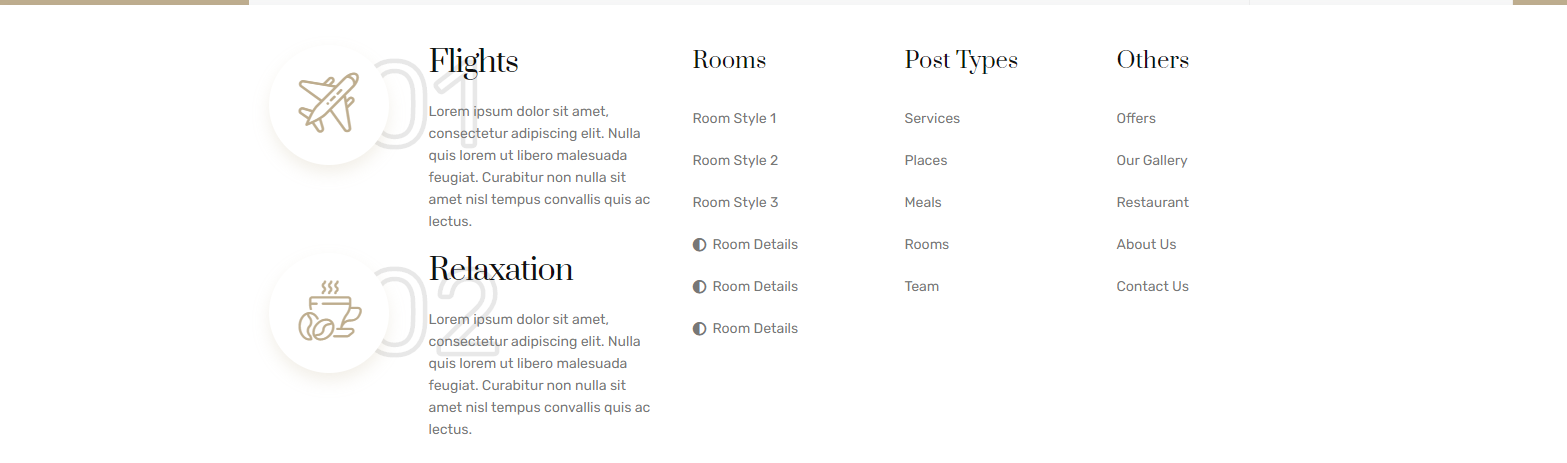
Infobox– This shortcode will show infobox with icons and different layouts..

Clients – This shortcode will show images for the clients logo in the slide view.

Blog– This shortcode will show the list of the posts with the different layouts and settings.

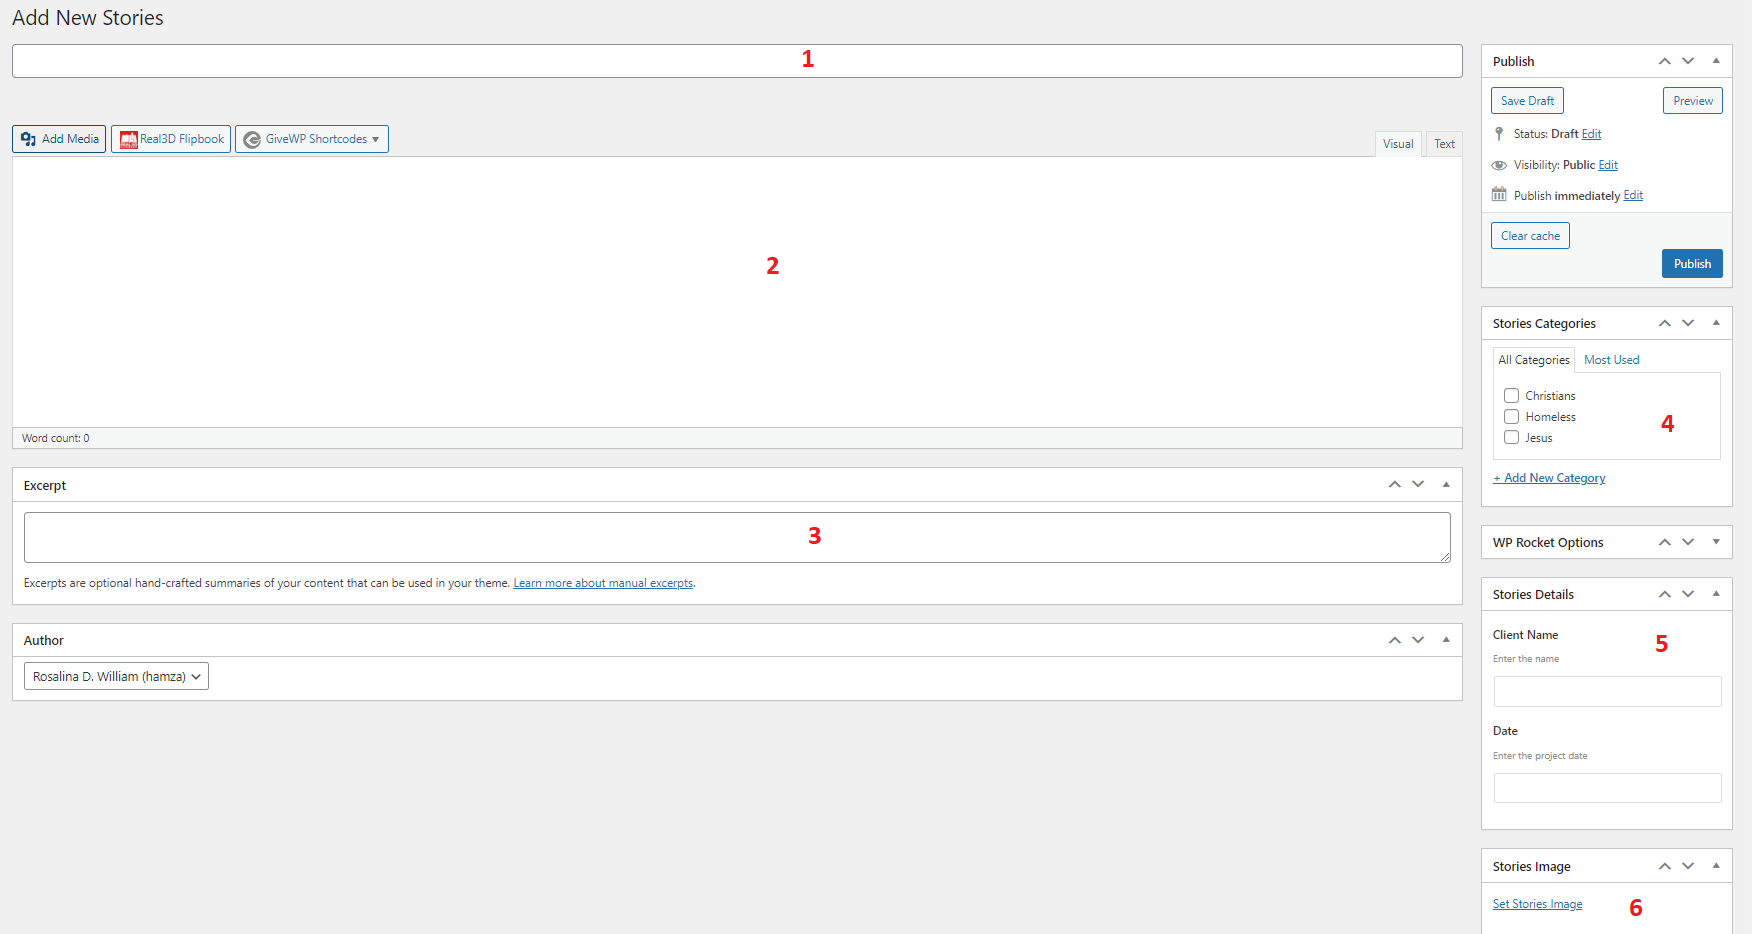
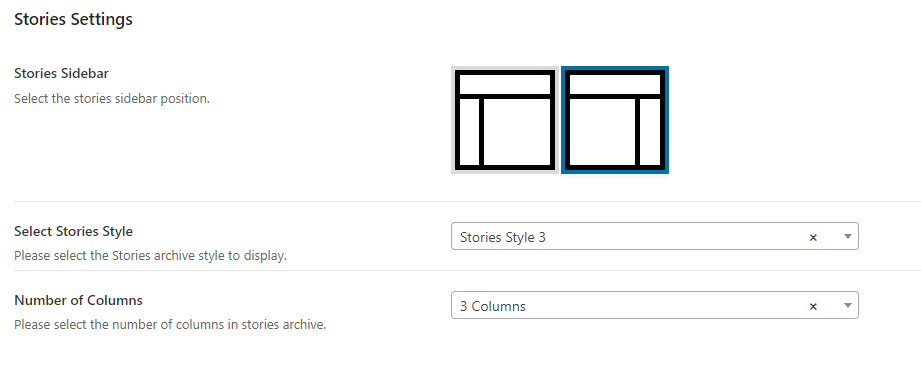
Stories– This shortcode will show the list of the stories with the different layouts and settings.

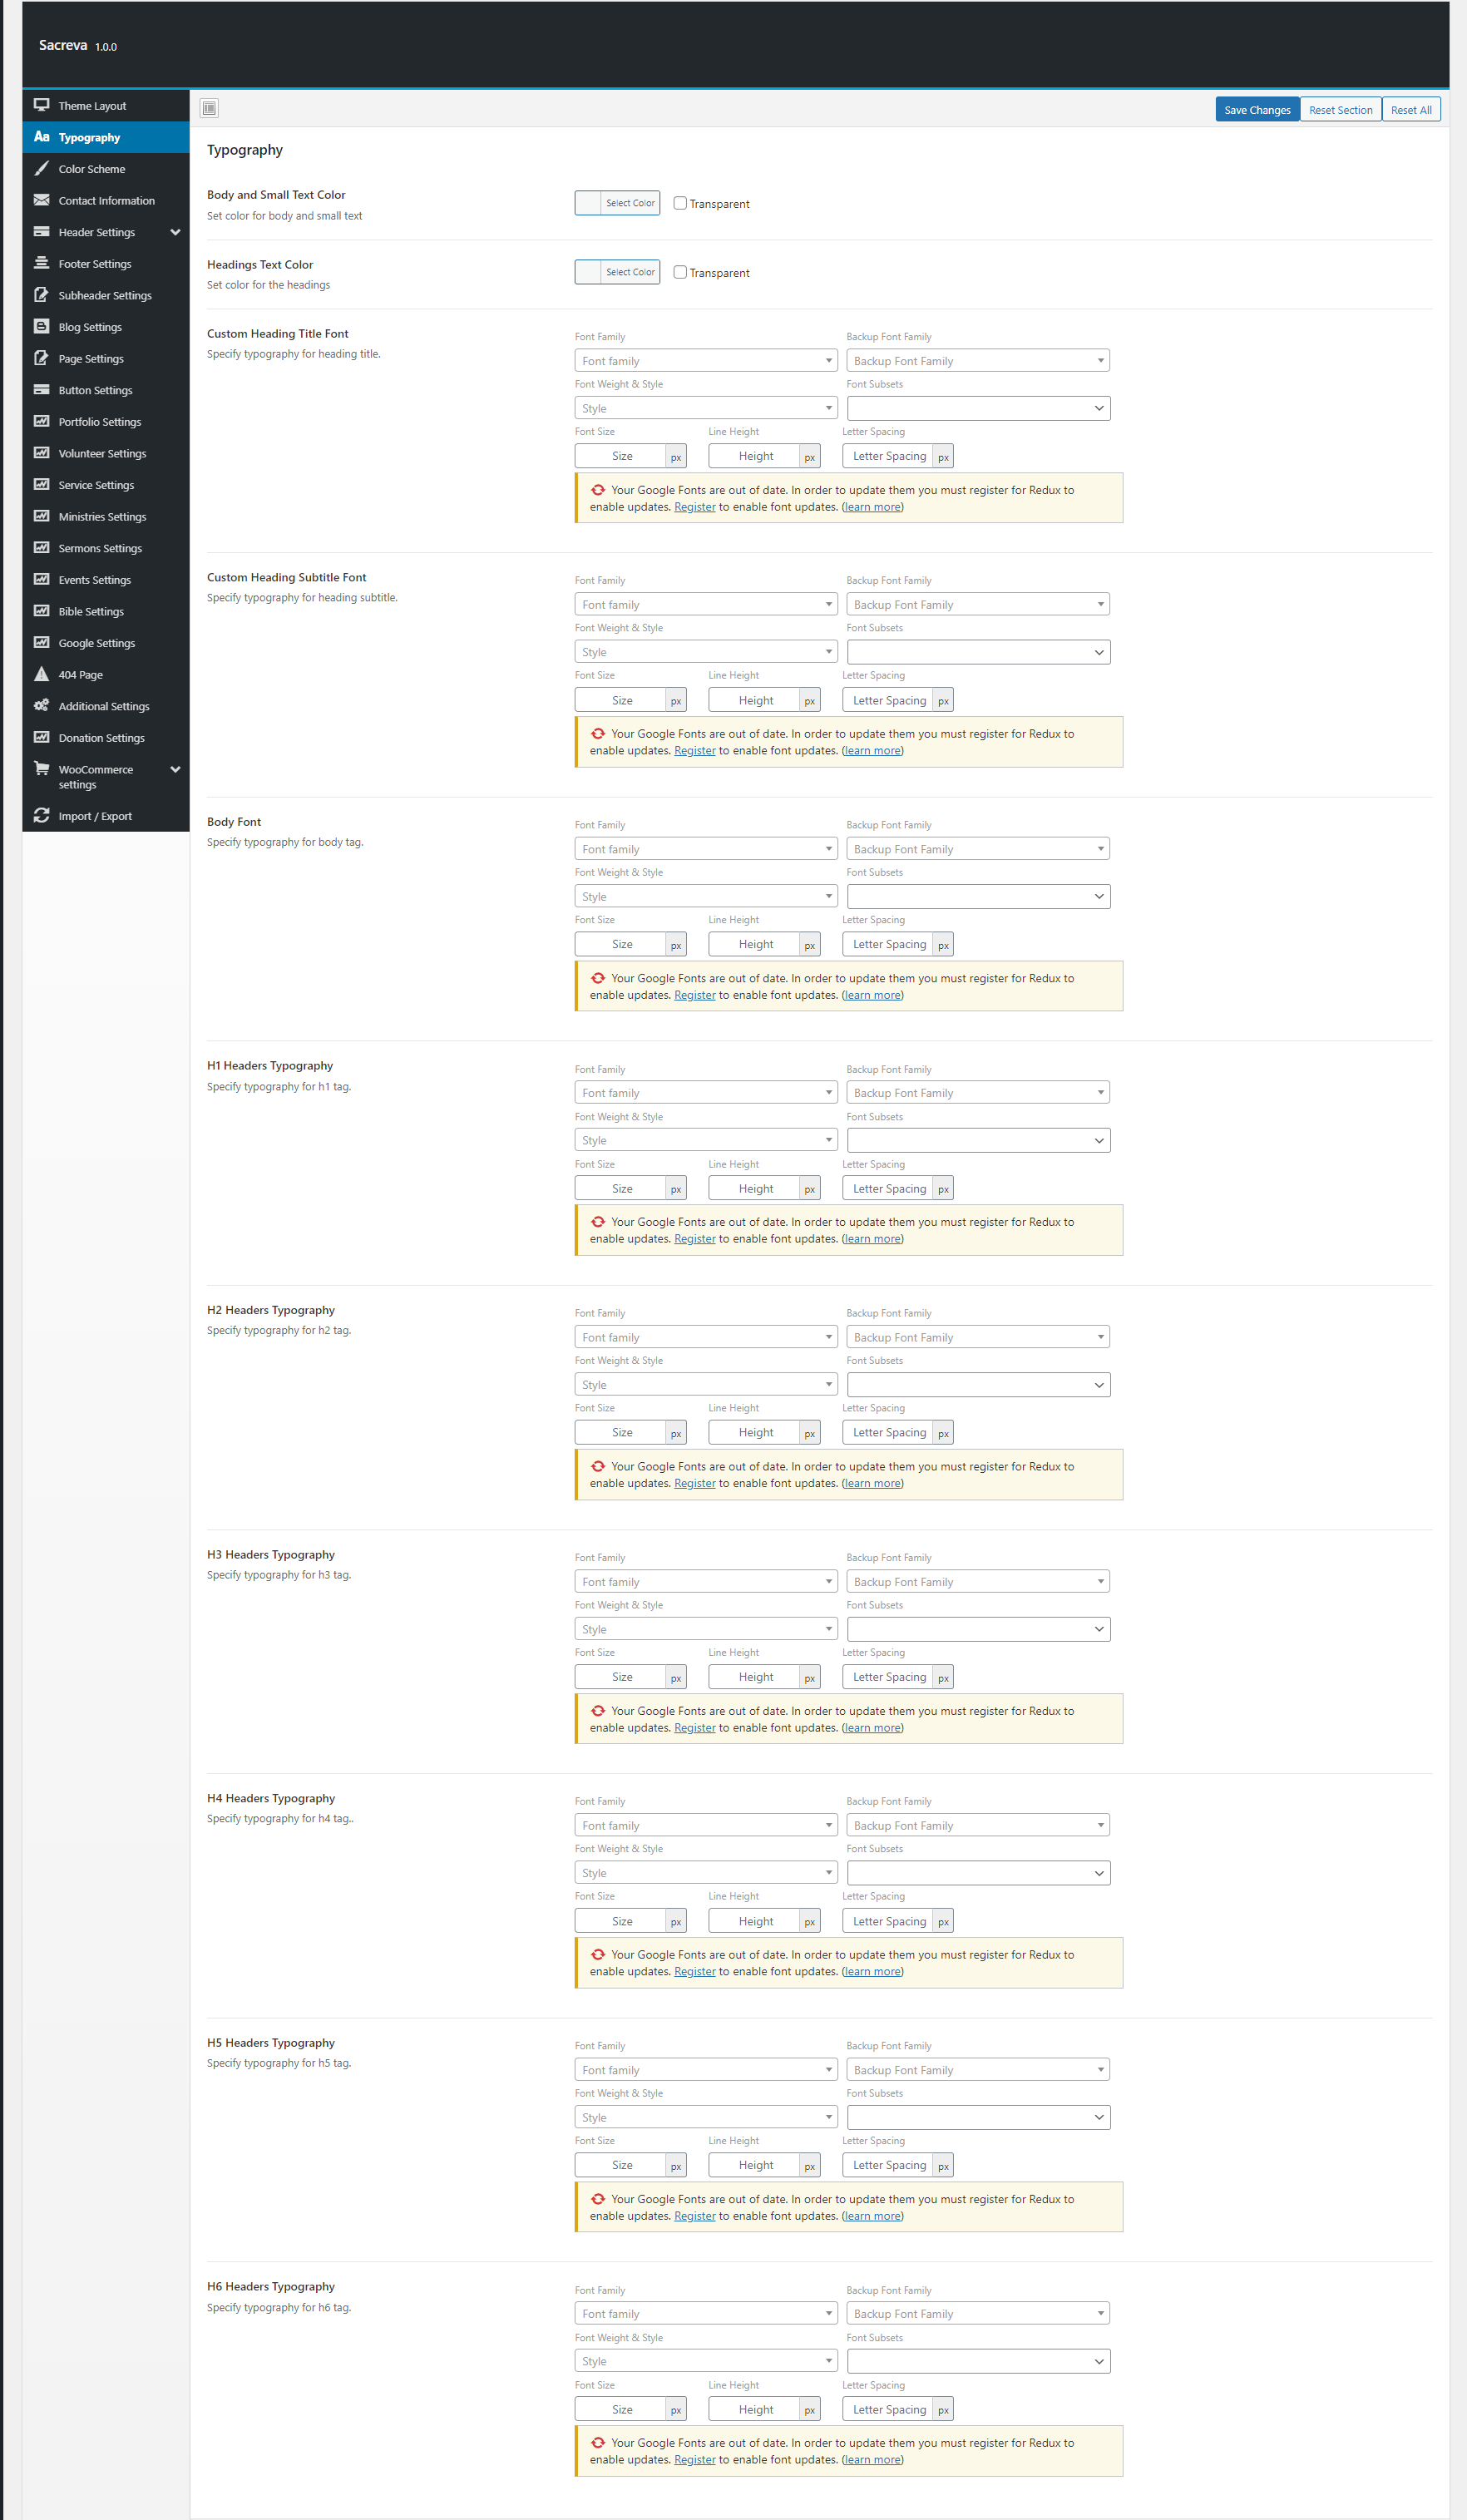
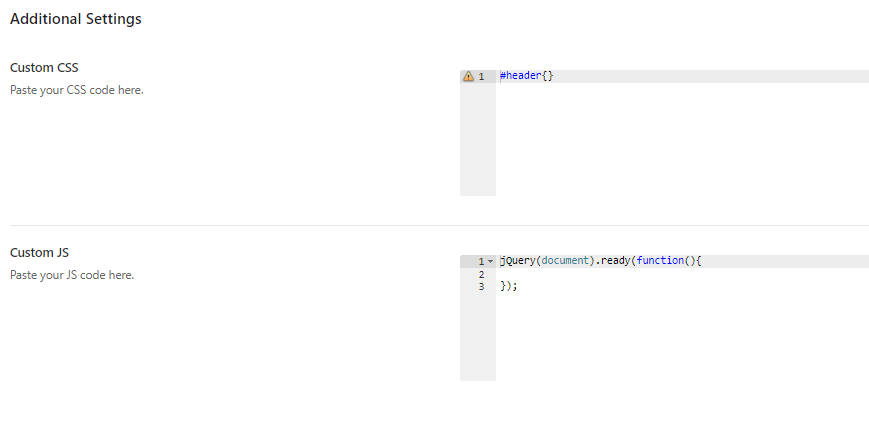
Custom Heading– This shortcode useful for to display the heading of the section, You can set the typography for this shortcode in theme options here ( Appearance > Theme Options > Typography )

List – This shortcode will show the list of the content with the icons.

Custom Images – This shortcode will Use this shortcode to show images.

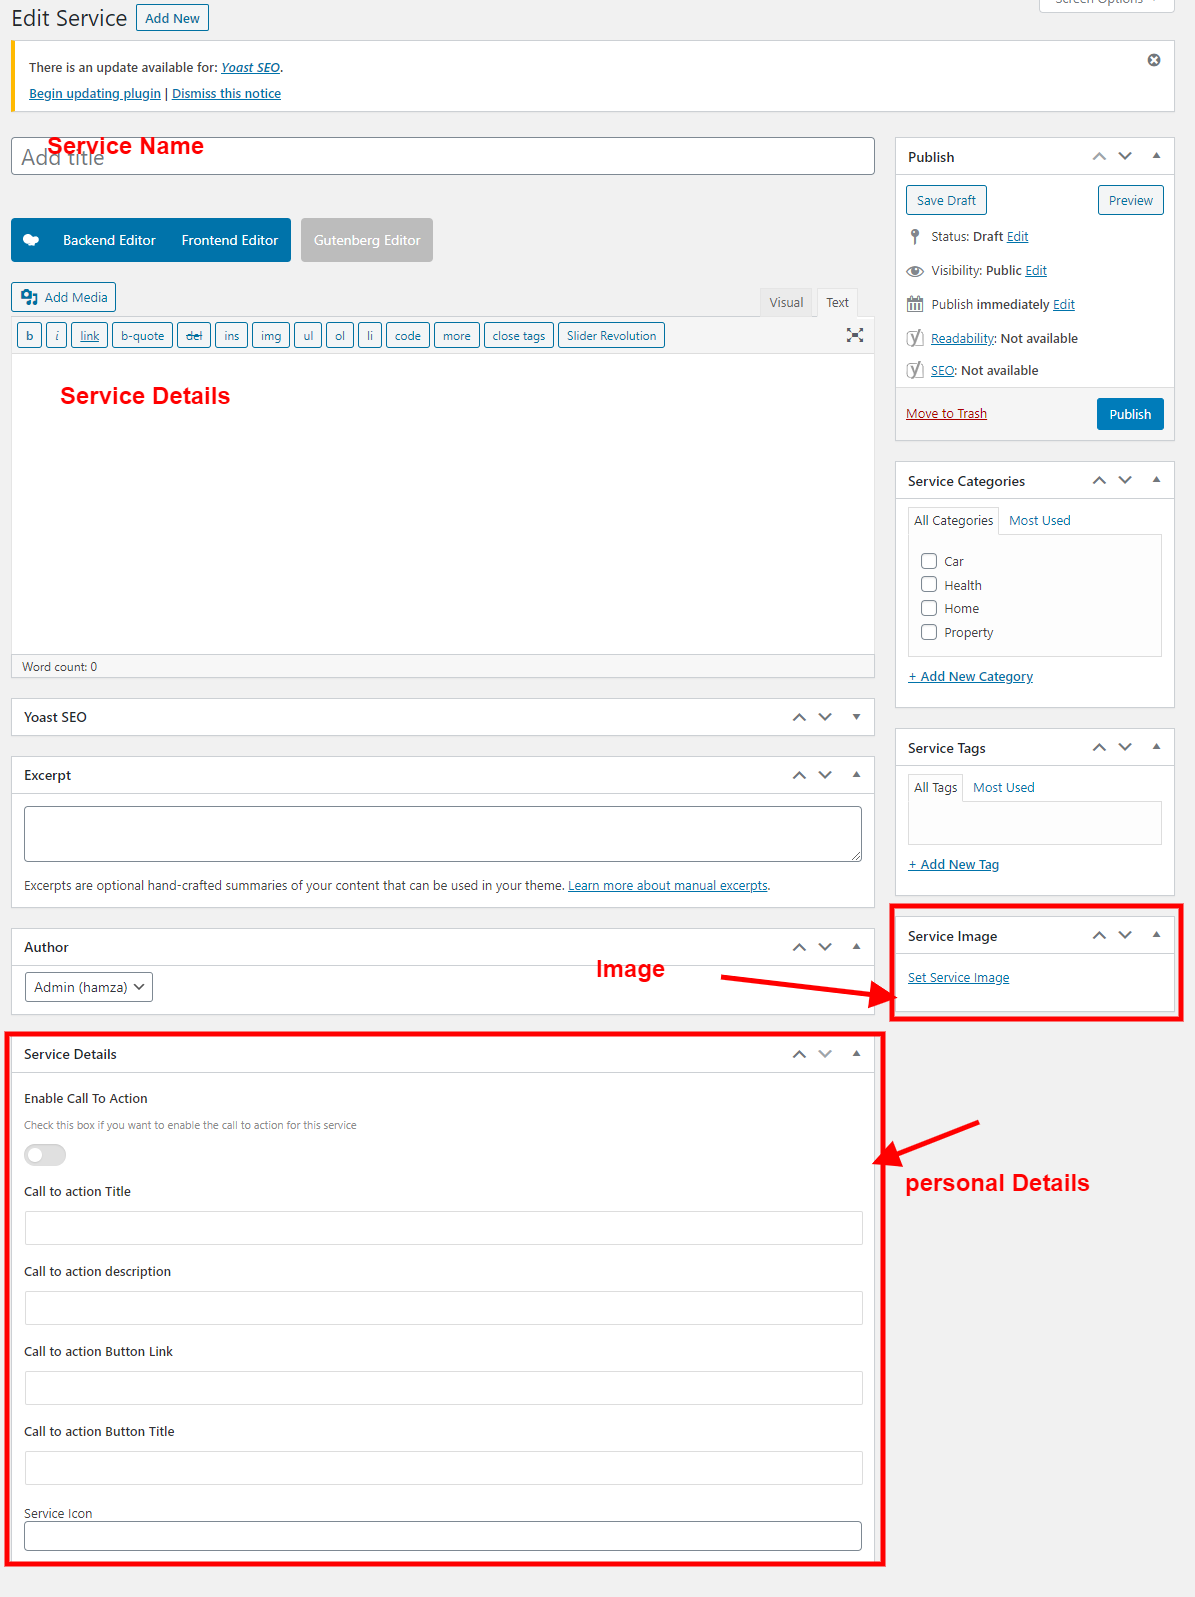
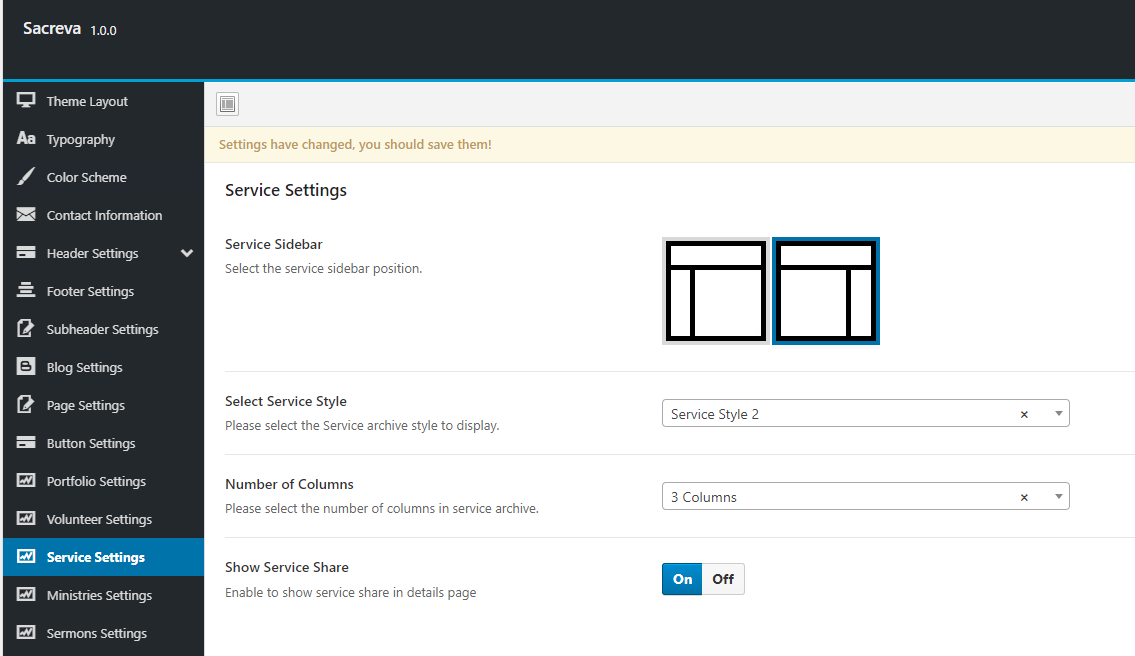
Service – This shortcode will Use this shortcode to services with different styles and layouts.

Custom tabs – This shortcode will Use this shortcode to show custom tabs.

Gallery – This shortcode will Use this shortcode to show gallery.

Call to Action – This shortcode will show the list of the content with the icons.

Basic Slider – This shortcode Use this shortcode to show simple slider.

History – This shortcode will Use this shortcode to show history chart.

Contact Form – This shortcode will Use this shortcode to show contact form.

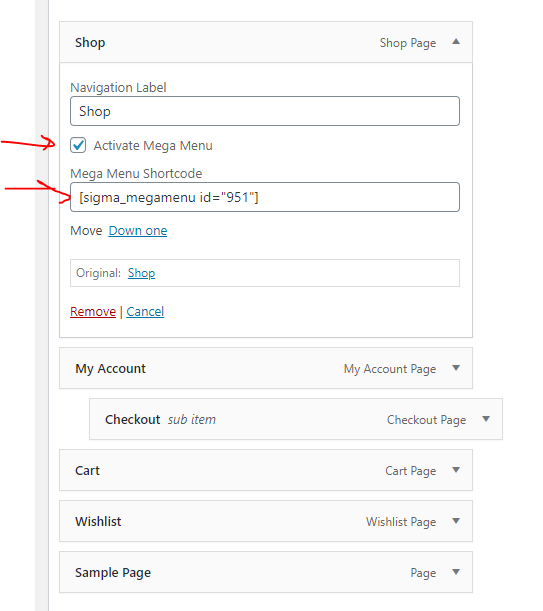
Megamenu Menu – This shortcode will Use this shortcode to show a Megamenu Menu.

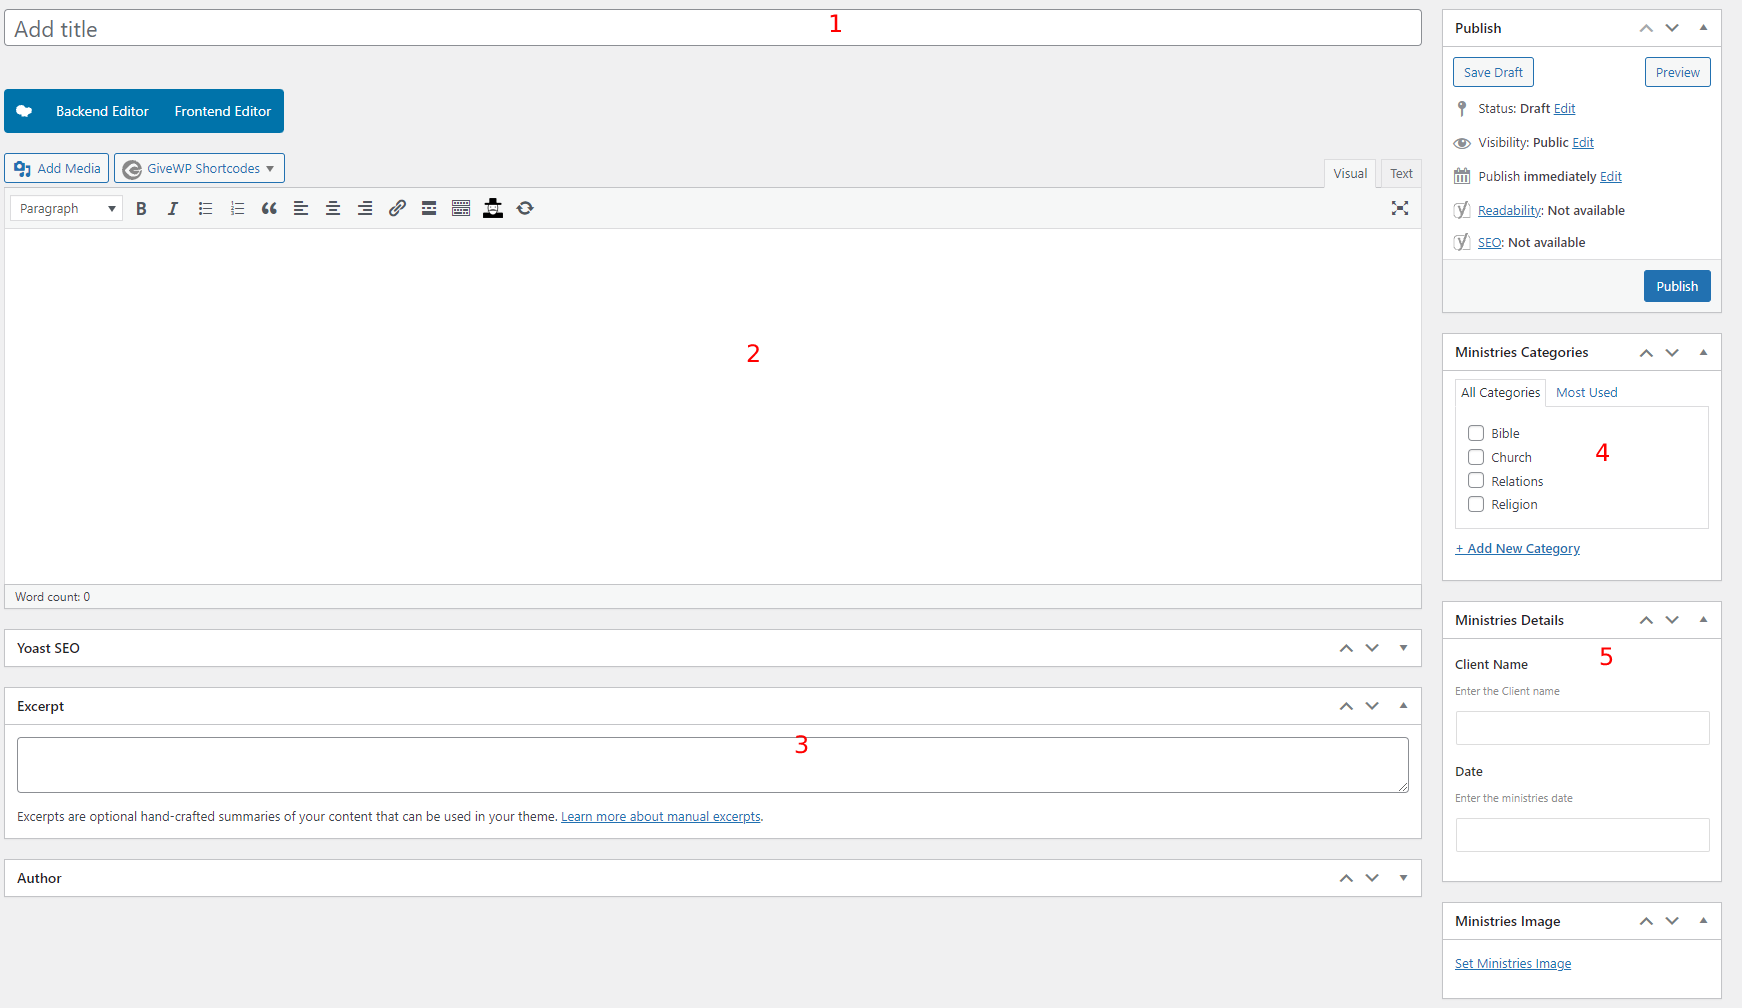
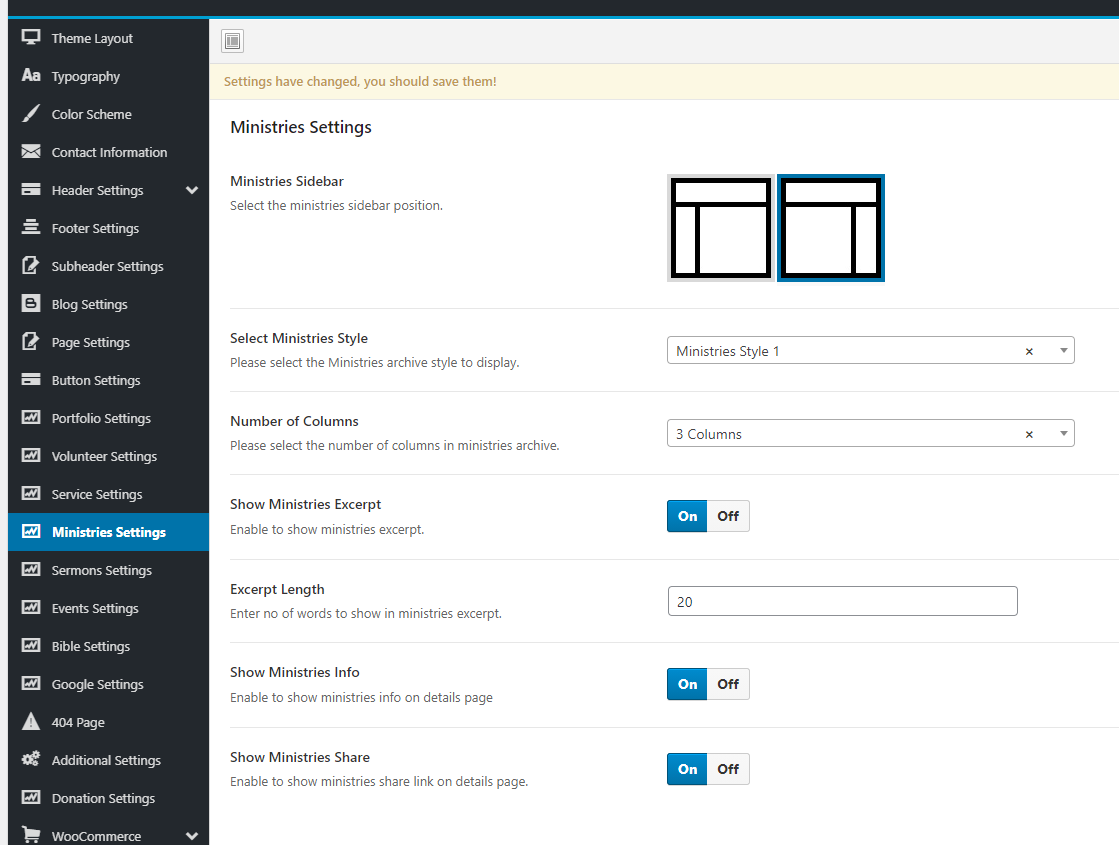
Ministries – This shortcode will Use this shortcode to show ministries with different styles and layouts.

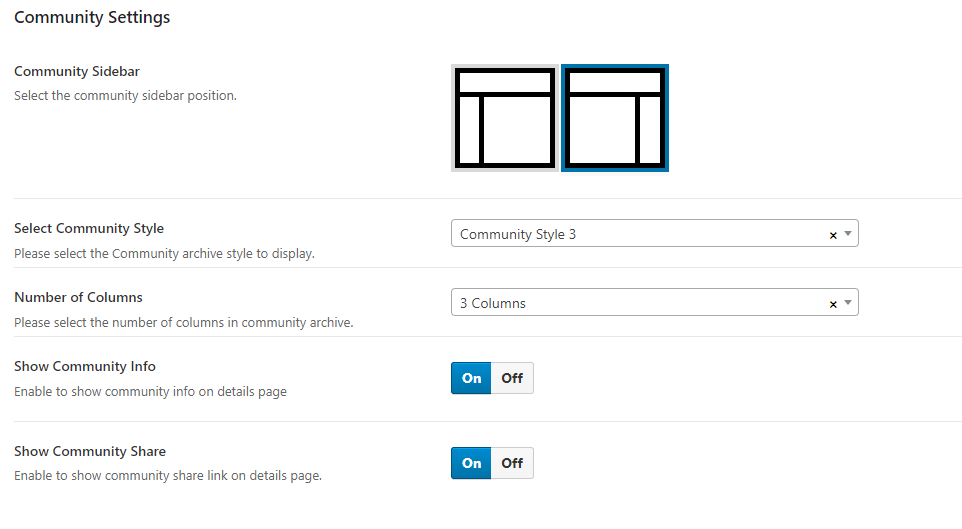
Community – This shortcode will Use this shortcode to show community with different styles and layouts.

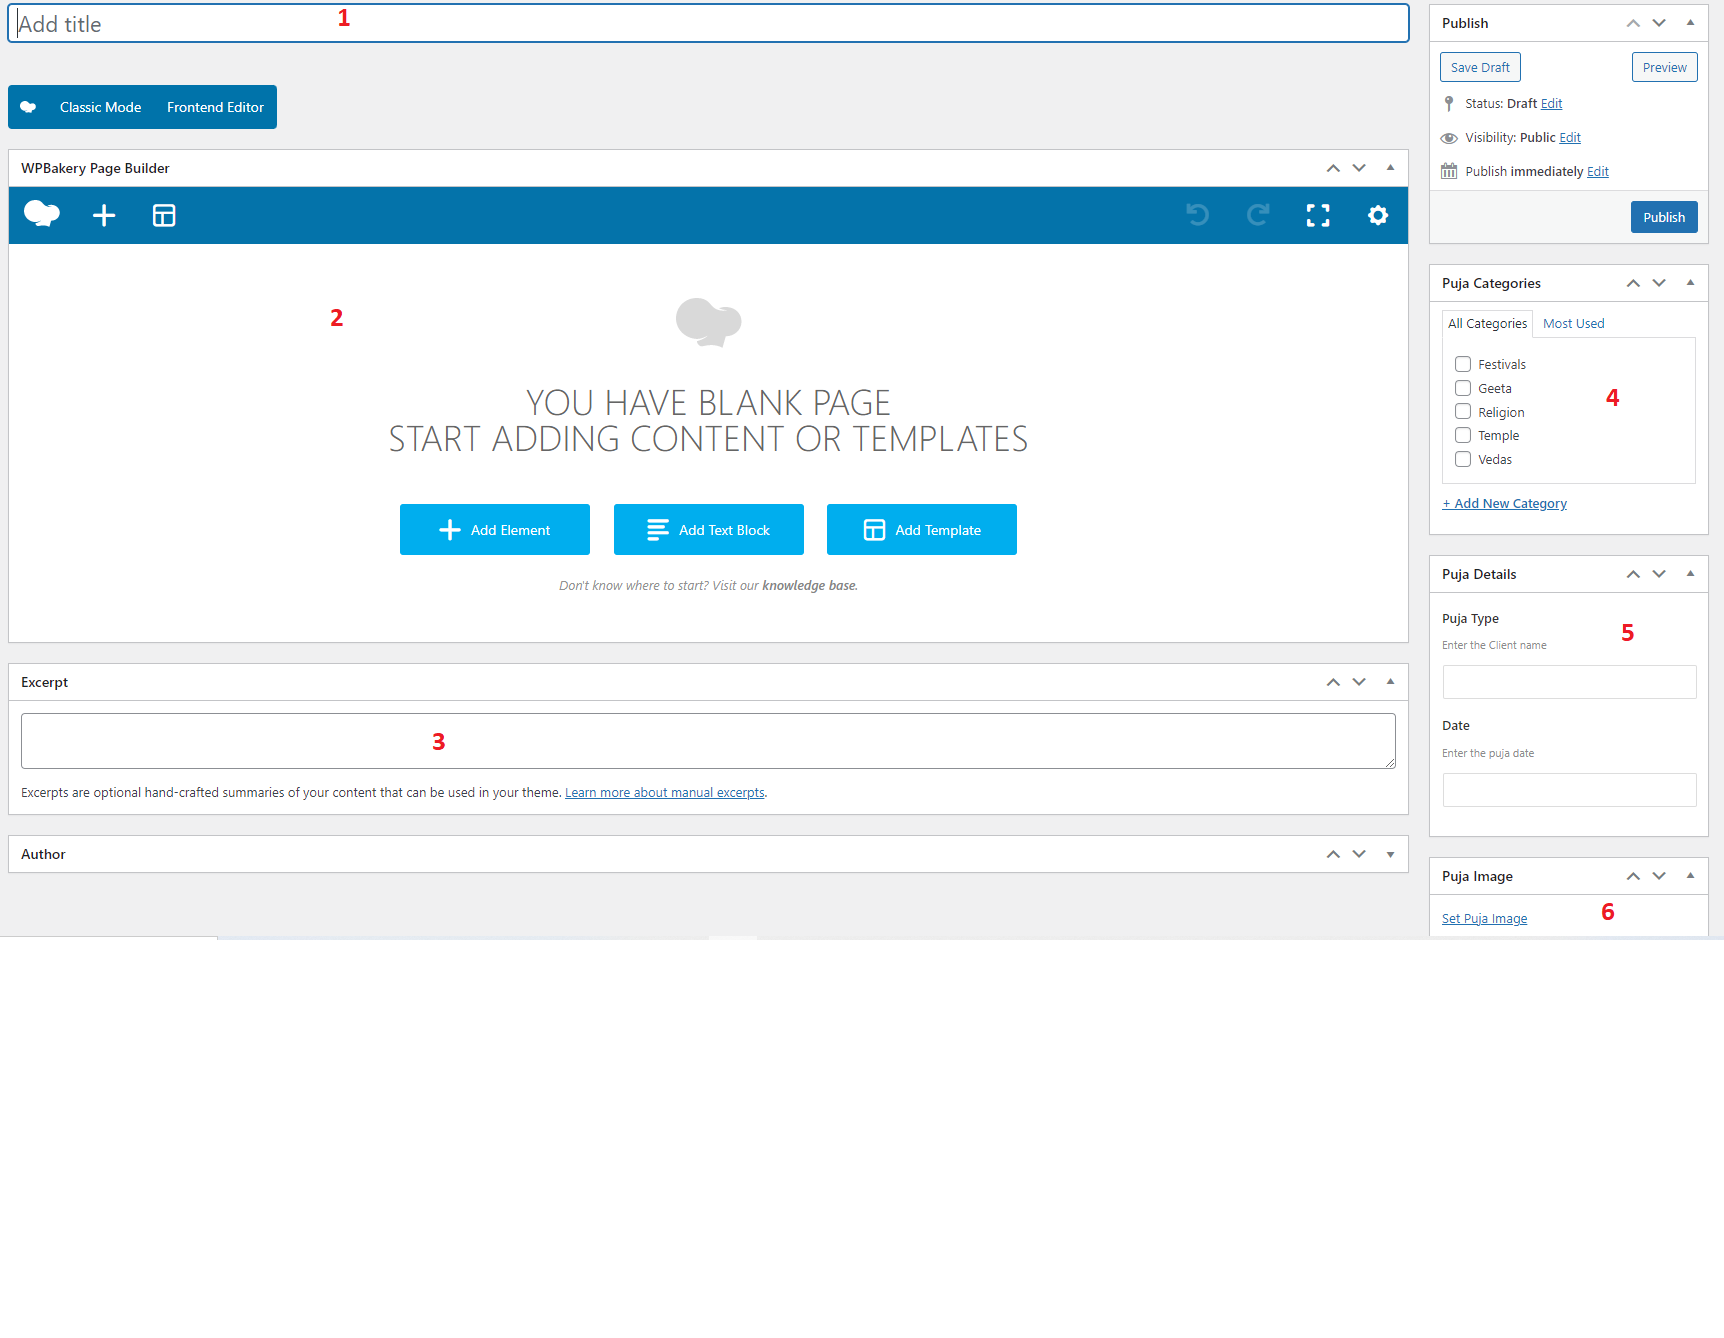
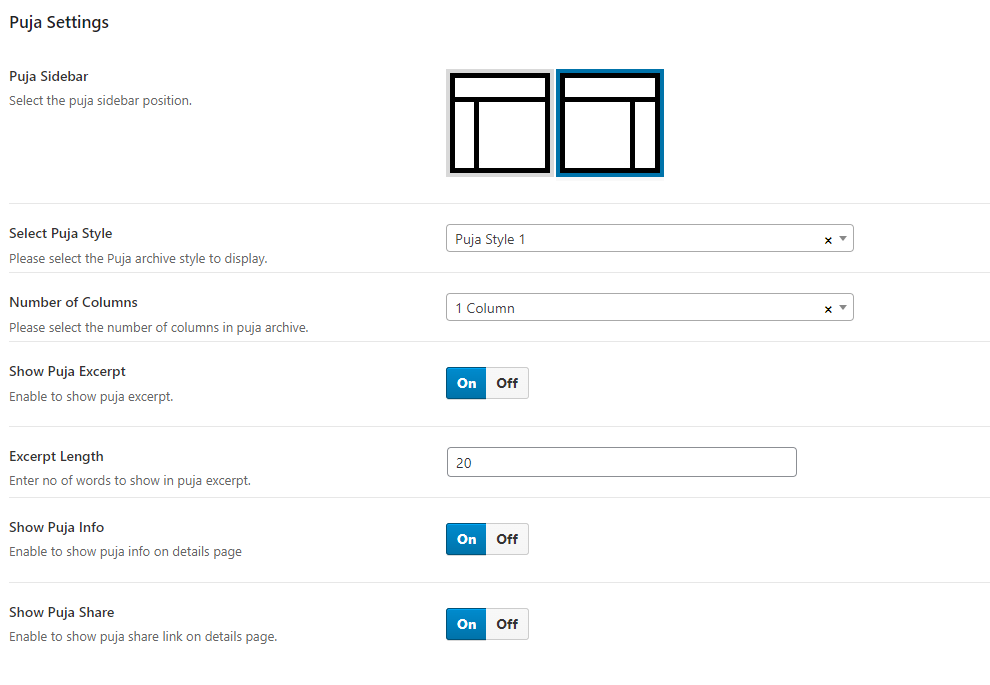
Puja – This shortcode will Use this shortcode to show puja with different styles and layouts.

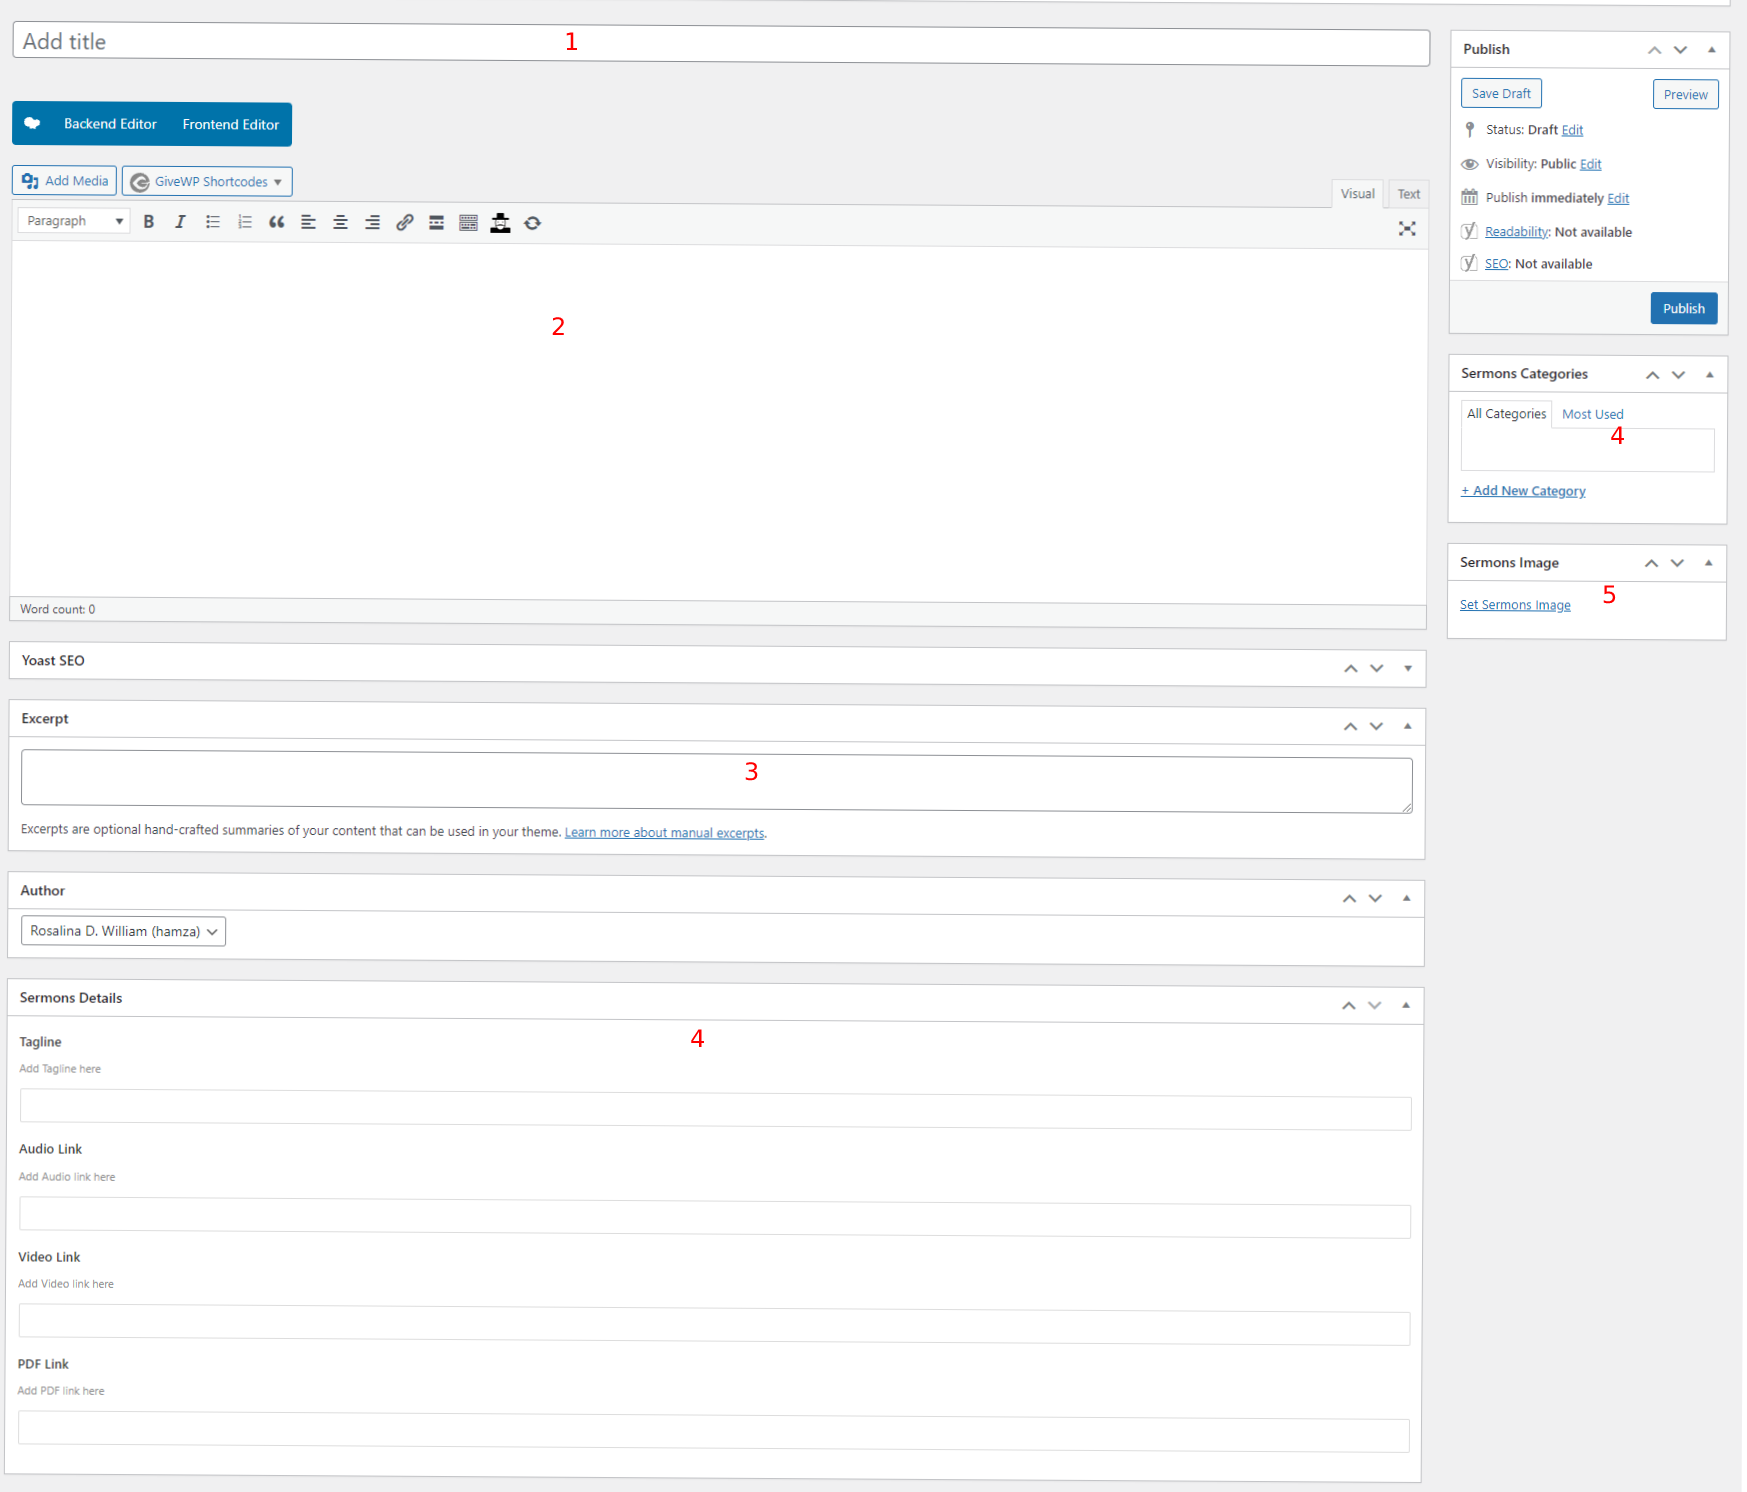
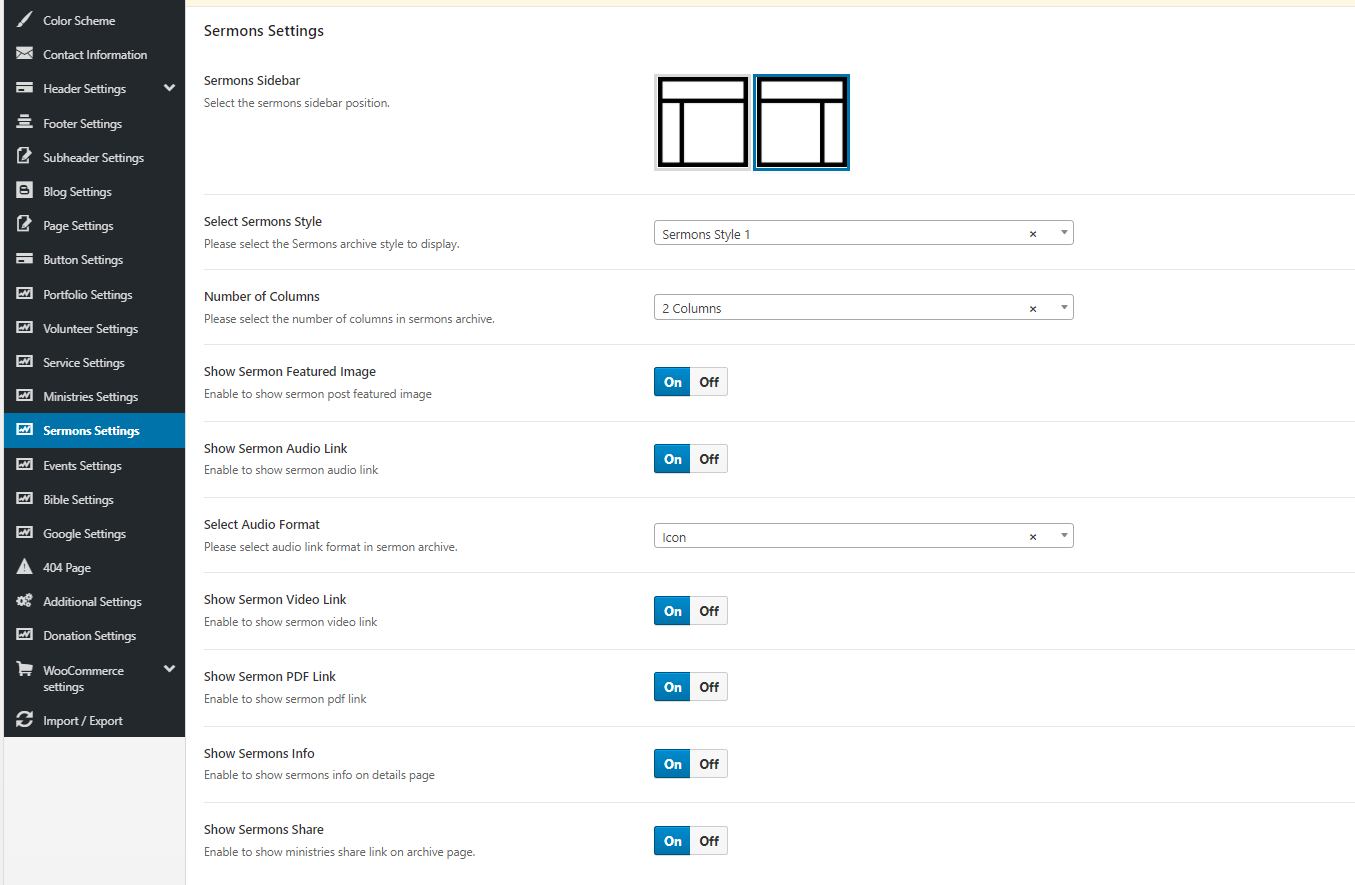
Sermons – This shortcode will Use this shortcode to show sermons with different styles and layouts.

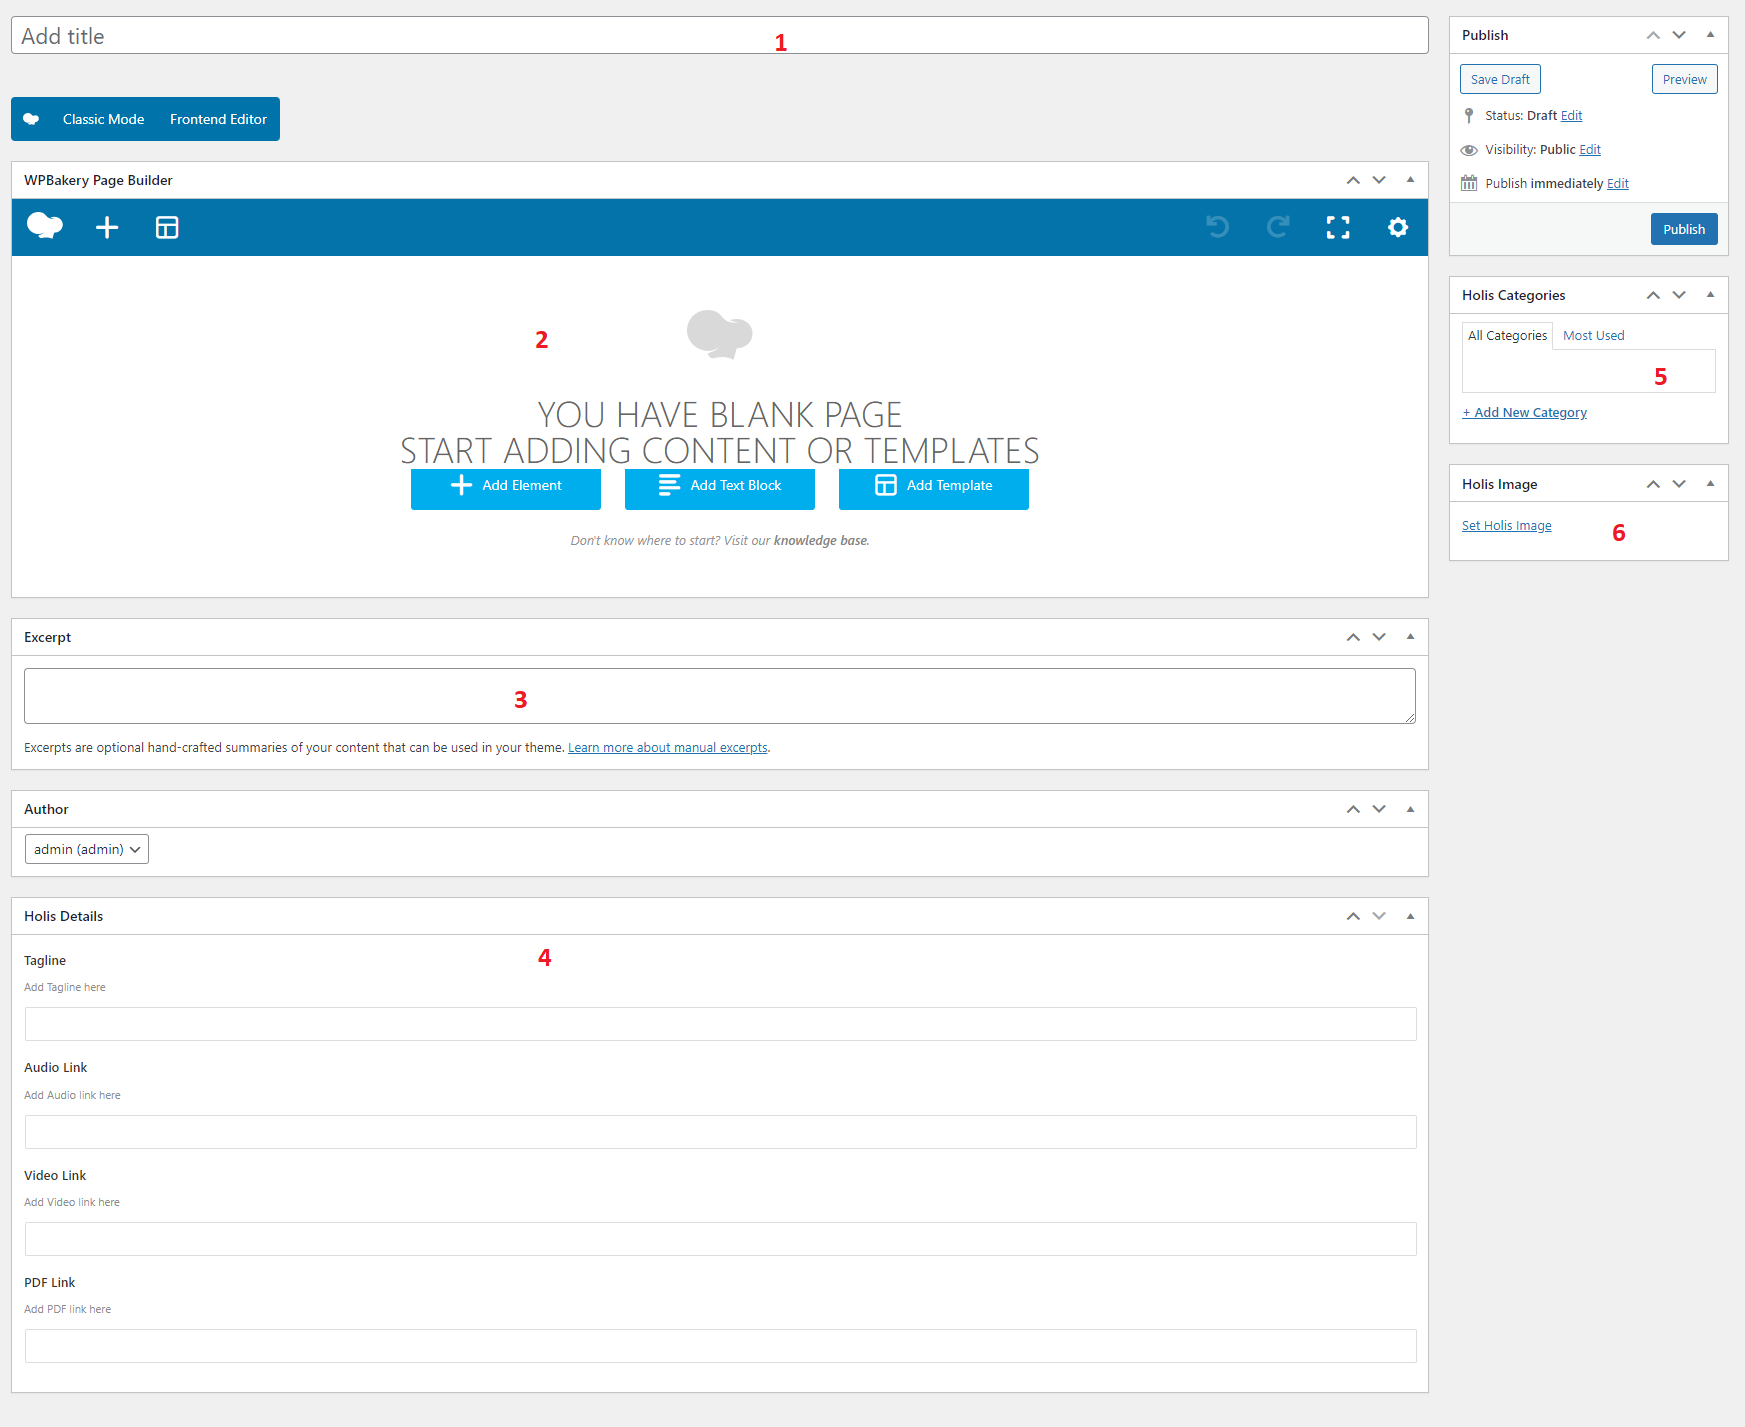
Holis – This shortcode will Use this shortcode to show holis with different styles and layouts.

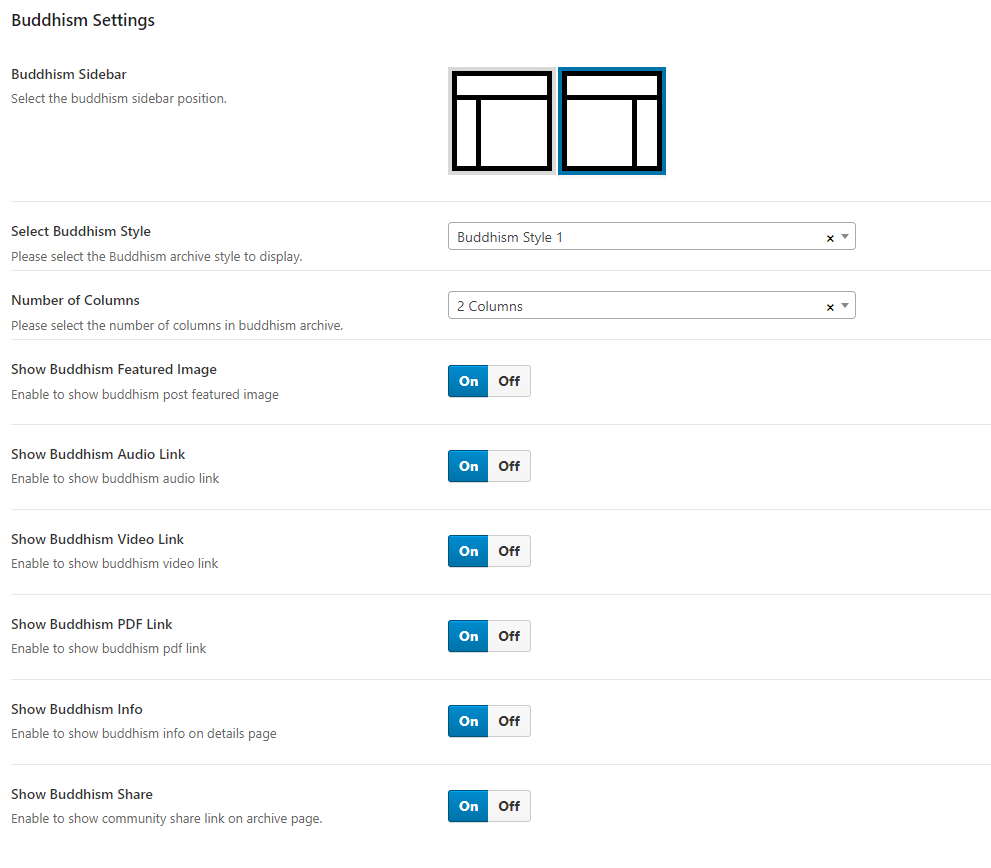
Buddhism – This shortcode will Use this shortcode to show buddhism with different styles and layouts.

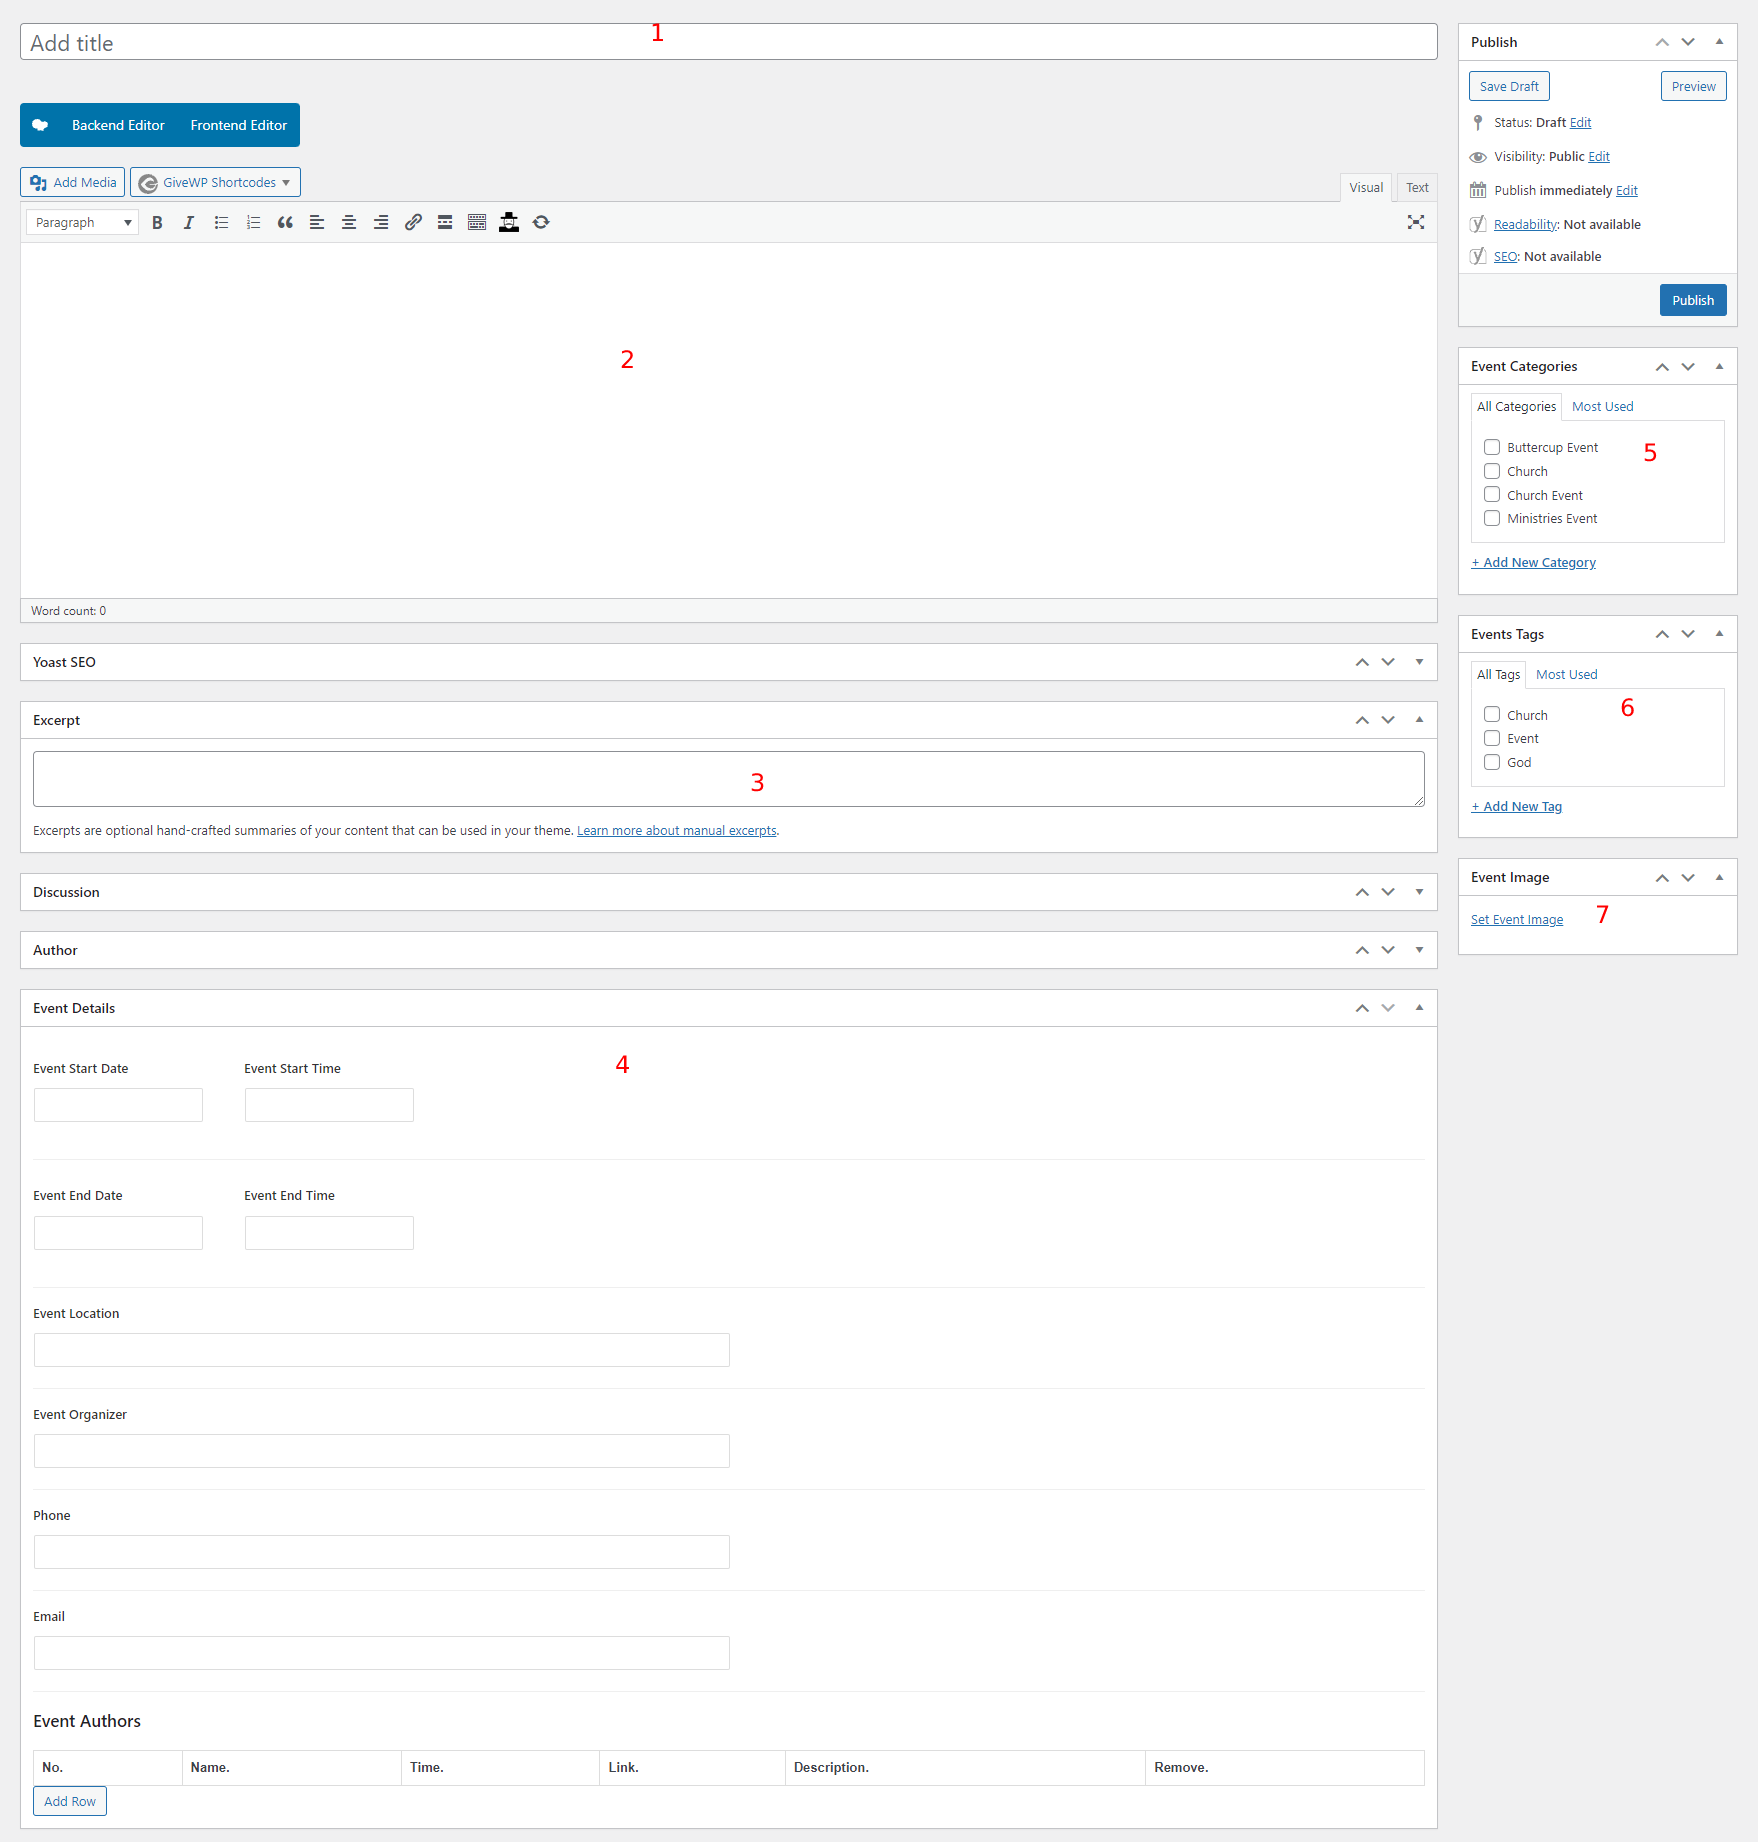
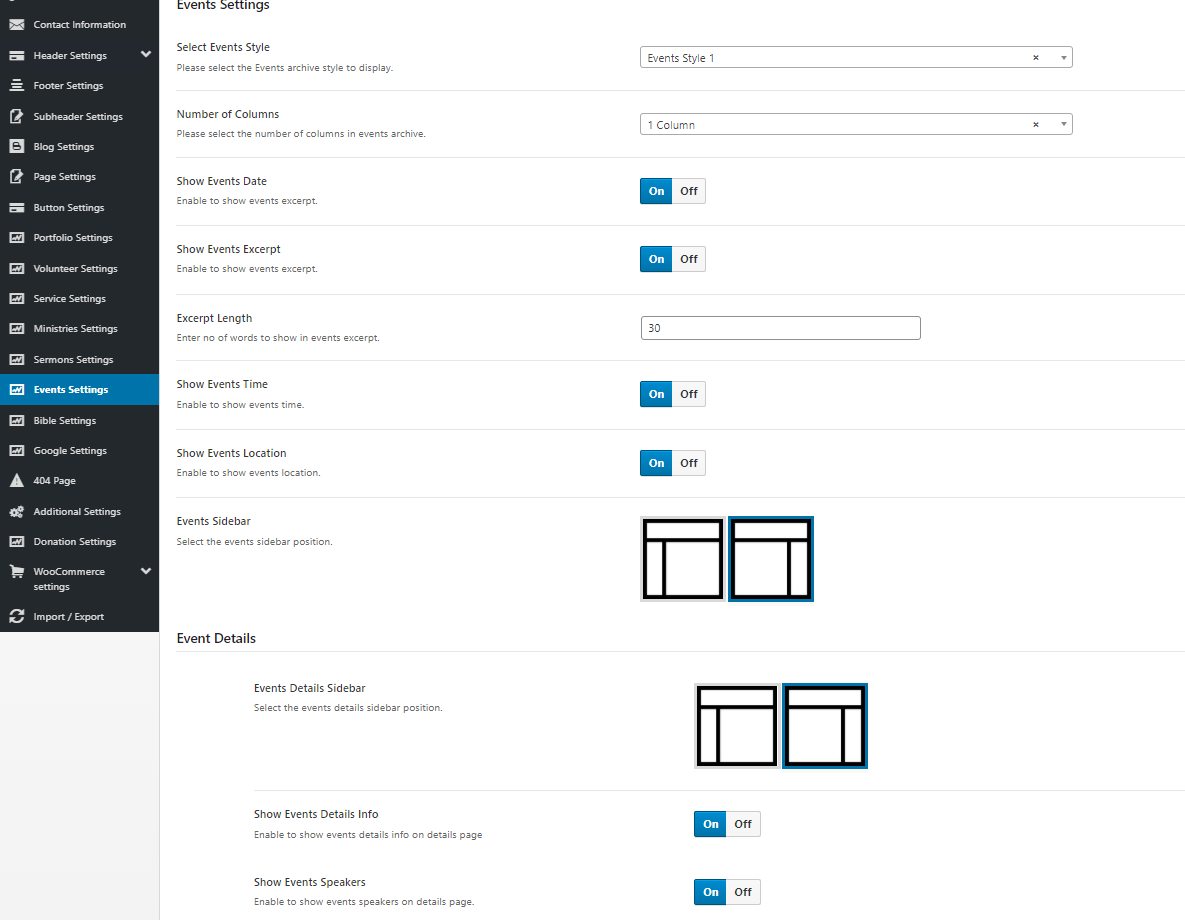
Events – This shortcode will Use this shortcode to show events with different styles and layouts.

Single Event – This shortcode will Use this shortcode to show single event with event select option.

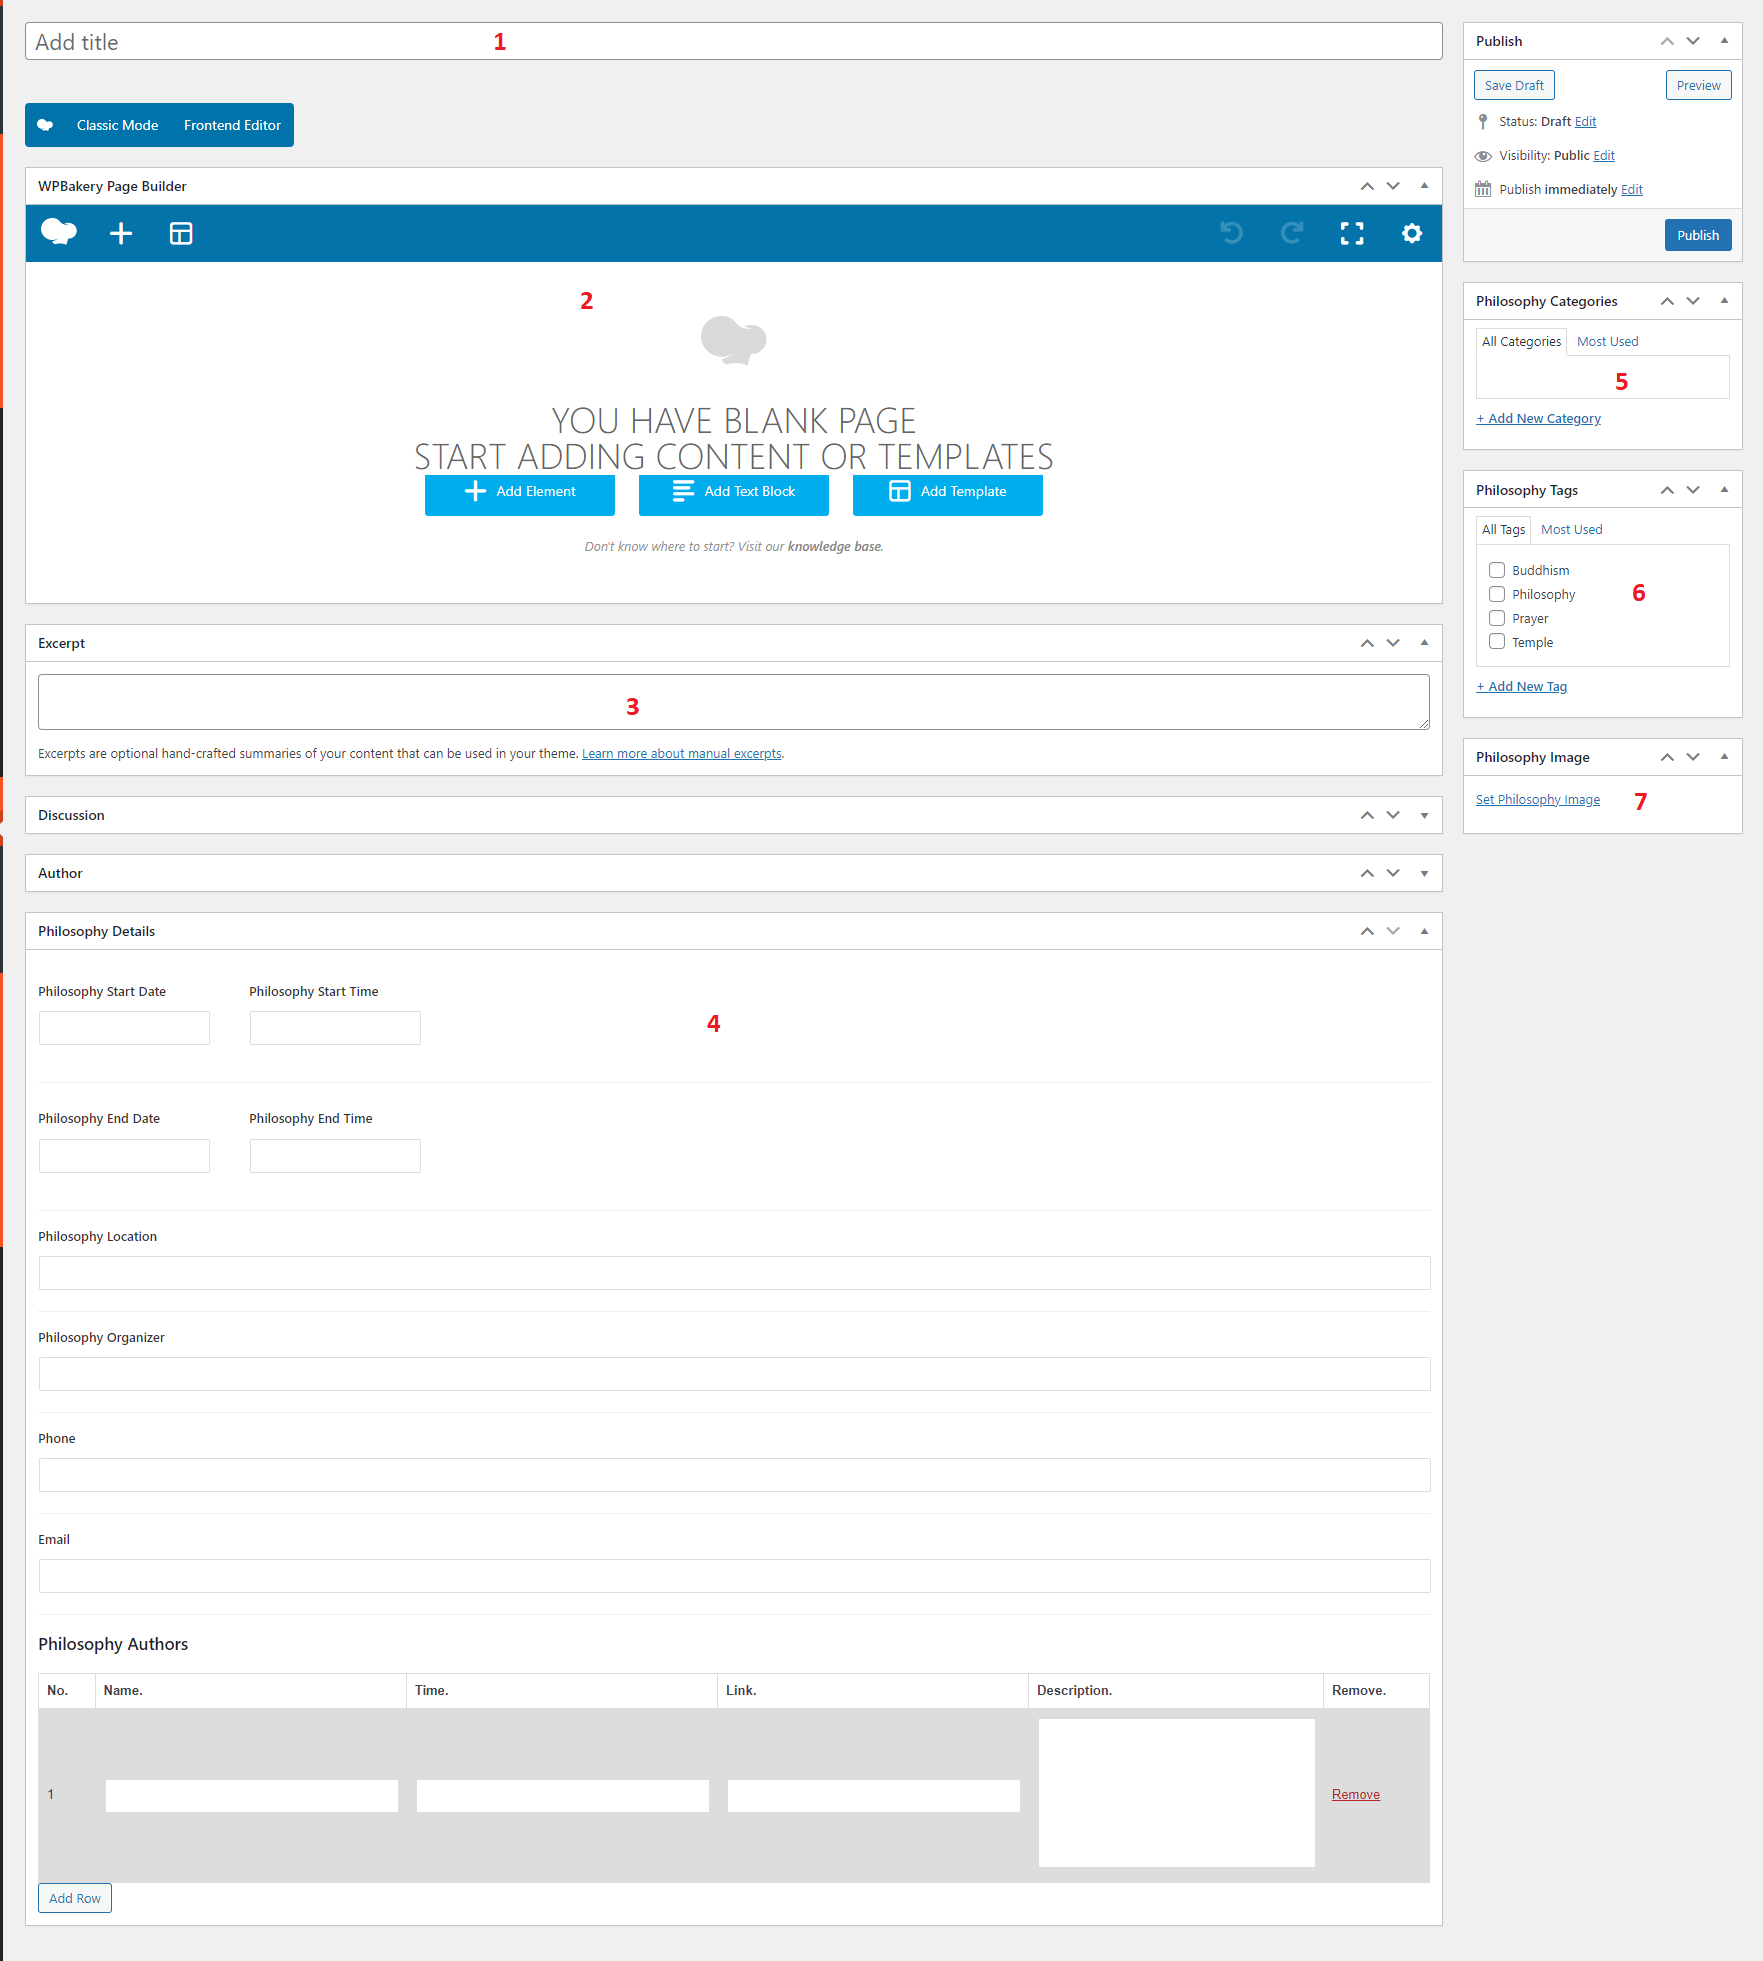
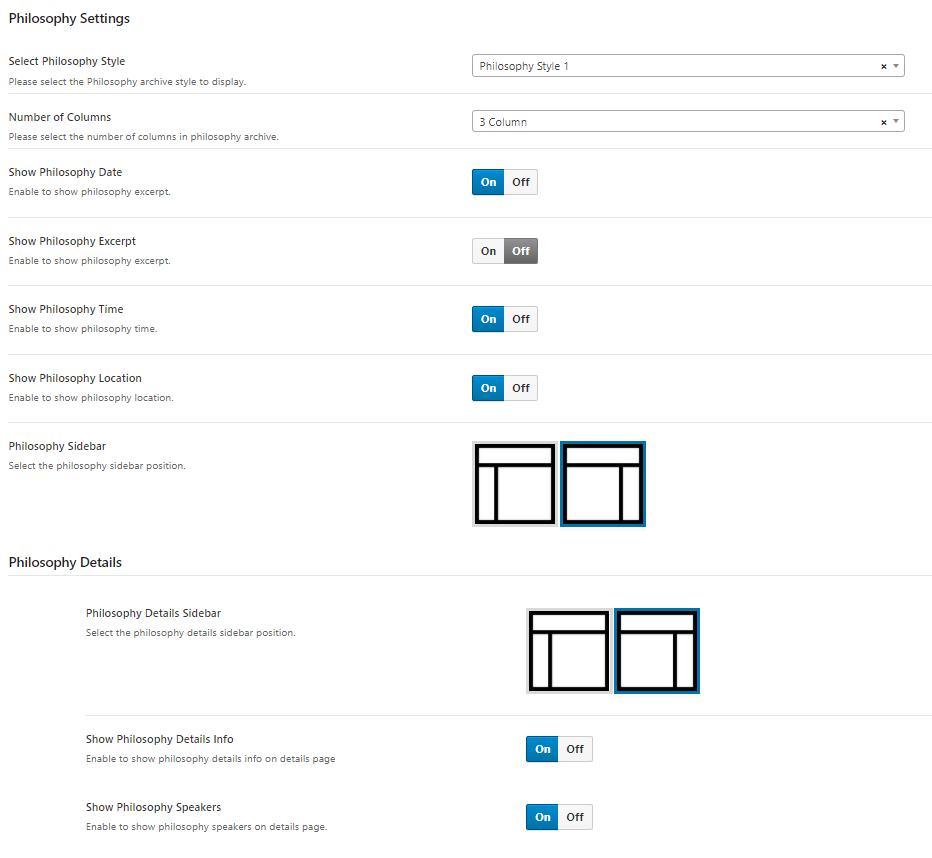
Philosophy – This shortcode will Use this shortcode to show philosophy with different styles and layouts.

Single Philosophy – This shortcode will Use this shortcode to show single philosophy with philosophy select option.

Megamenu Menu – This shortcode will Use show menu items with option for megamenu in header.

Megamenu Tabs – In this shortcode you can select custom template for megamenu.

Testimonial Slider – This shortcode will Use this shortcode to show testimonial slider.

Youtube Broadcast – This shortcode will Use this shortcode to show live youtube video (Header livestream staus will depend on this shortocde channel link).

Youtube Playlist – Using this shortcode you can show playlist of any channel.

Time Table – This shortcode is use to show time table of custom events.

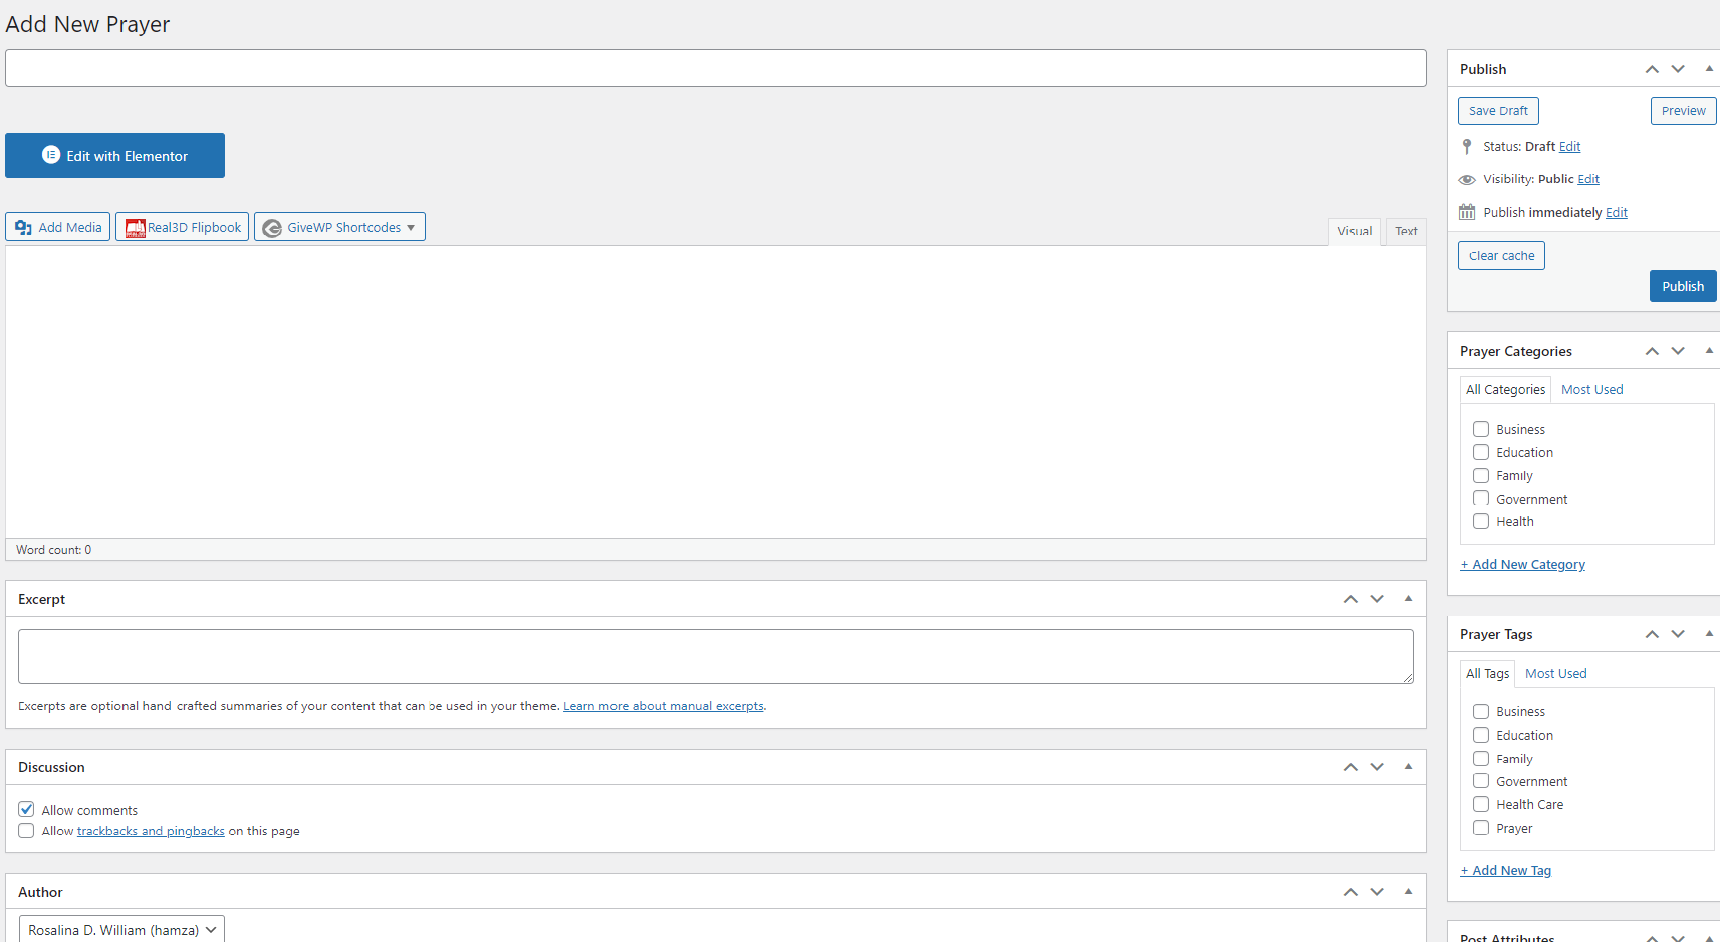
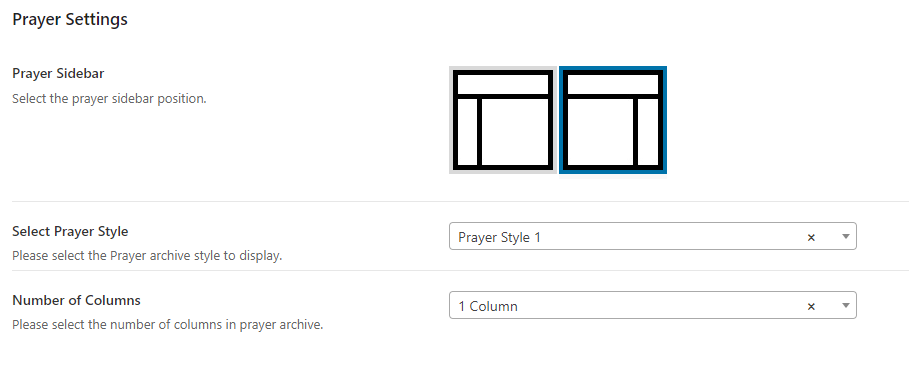
Prayer – This shortcode is use to show prayer posts(verses)with differnt layouts and styles

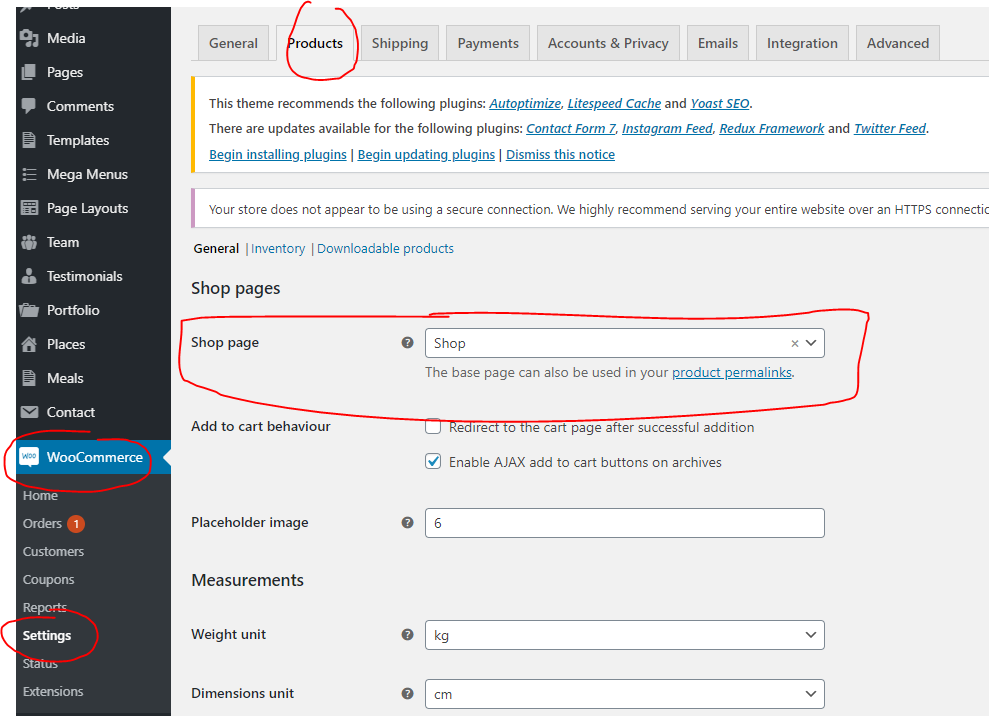
Products – This shortcode will Use this shortcode to show products with different styles and layouts.

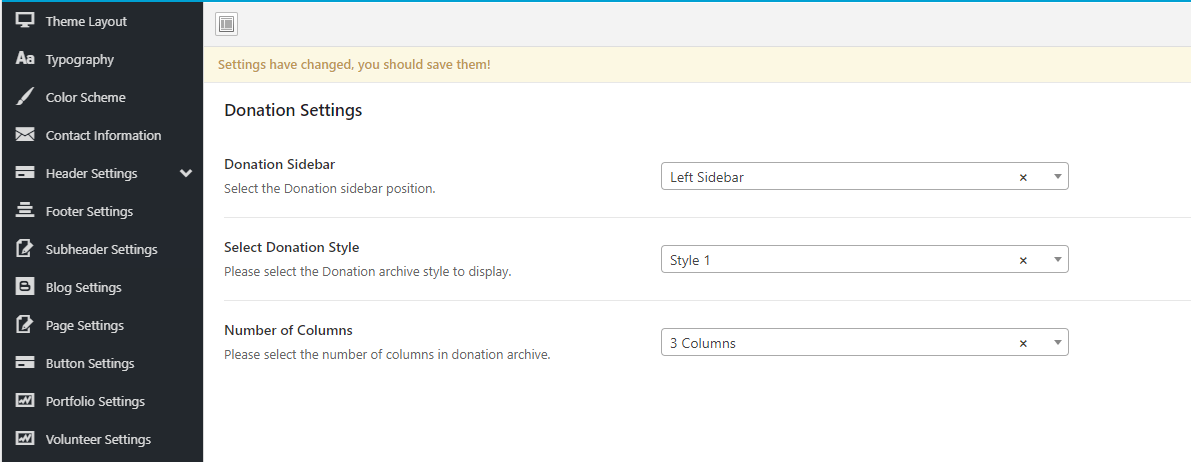
Give Donations – This shortcode will Use this shortcode to show give donation with different styles and layouts.

Widget Sidebars

We have created different sidebars for the widgets. There are the individual sidebars for the Blog page, Normal page, and stories page named with the Blog sidebar, Page Sidebar, stories sidebar. You can use the widgets to set the widgets as per your requirements. There are also other Fours sidebars for the footer area named Footer 1, Footer 2, Footer 3, Footer 4 to create the different grid layout for the footer.

Page Sidebar – Sidebar for the blog single and the listing page.

Stories Sidebar – Sidebar for the Stories.

Ministries Sidebar – Sidebar for the Ministries.

Puja Sidebar – Sidebar for the Puja.

Community Sidebar – Sidebar for the Community.

Sermons Sidebar – Sidebar for the Sermons.

Buddhism Sidebar – Sidebar for the Buddhism.

Holis Sidebar – Sidebar for the Holis.

Events Sidebar – Sidebar for the Events.

Events Details Sidebar – Sidebar for the Events Details.

Philosophy Sidebar – Sidebar for the Philosophy.

Philosophy Details Sidebar – Sidebar for the Philosophy Details.

Prayer Sidebar – Sidebar for the Prayer.

Services Sidebar – Sidebar for single Services page.

Header Collapse Sidebar – Sidebar for toggle header

Shop Sidebar – Sidebar for Shop page.

Product Details Sidebar – Sidebar for Product Details page.

Footer 1 – Sidebar for footer layout 1.

Footer 2 – Sidebar for footer layout 2.

Footer 3 – Sidebar for footer layout 3.

Footer 4 – Sidebar for footer layout 4.

GiveWP Single Form Sidebar – Sidebar for donation details page.

Accomodation Sidebar – Sidebar for rooms and accommodations

Page Layouts

You can consider page layouts as theme options for a specific page. Although, not all theme options are supported in page layouts. To get started, simply follow the below steps

Step 1:

Navigate to Page Layouts > Add New

Step 2:

Adjust the settings to your liking under the Layout Settings fields

Step 3:

Head over to the page you want this page layout to get assigned to, and assign it


Notice how in the images in the right hand side, that our home page has a header style, and our contact page has another style since we selected a different header style for our Contact Page Layout, and assigned it only to our contact page


Mega Menu

Make sure you have WordPress 5.4.x and above for the MegaMenu to work.

Consider yourself creating a normal page, so after you followed the article in How To > Enable Bakery for Post Types, navigate to Mega Menus > Add New in your WordPress dashboard and follow the below steps:

Step 1:

Let's start by creating a megamenu. First go to your WordPress dashboard and navigate to Mega Menus > Add New

Step 2:

Create your megamenu content. All shortcodes work in the megamenu, but we added specific shortcodes that just work for the megamenu, you can find them in Sigma Header tab of the WP Bakery shortcode library

Step 3:

For this example we will be adding 1 Column of Icon Box shortcode, and 3 columns of Mega Menu shortcodes, and we will also fix the row spacing to make the mega menu look well spaced.

Step 4:

Once you created your Mega menu content, head back to the All Mega Menus page, and copy the mega menu shortcode

Step 5:

Navigate to Appearance > Menus and create a new menu or use an existing one, and paste the Megamenu shortcode where you want it to appear ONLY WORKS ON LEVEL 1 MENU ITEMS, and activate megamenu for this item

If you can't see the Mega Menu fields pointed out in the image, scroll to the top of your page and look for screen options, and turn on Activate Mega Menu and Mega Menu Shortcode


Note: Check the How To > Enable Bakery for Post Types article in the documentation to enable Backend editor for Mega Menus

Enable Elementor Post Types

First, make sure you have Elementor plugin active, then navigate to Elementor > Settings, and check the checkboxes in which you want to enable Elementor backend editor for.

Enable Bakery Post Types

First, make sure you have WP Bakery plugin active, then navigate to WPBakery Page Builder > Role Manager, and change the Post Types option to Custom and select the post types that you want to enable WP Bakery backend editor for.


Note: this is where you activate bakery backend editor for Mega Menus and Page Templates

Setup WooCommerce

When you first import a demo, WooCommerce settings might not come with it. So, you will need to do some minor configuration to get things going. This might cause some issues like redirecting to the Home page when you try to access the My account page, or even cart/checkout pages

Step 1:

To solve this, navigate to your WordPress dashboard and go to WooCommerce > Settings > Products, and assign a shop page

Step 2:

Then go to the Advanced tab, and assign your cart, checkout and account pages.


Note that the pages should have the following shortcodes added to their content as per the WooCommerce documentation:

  • Cart Page: [woocommerce_cart]
  • Checkout Page: [woocommerce_checkout]
  • My Account Page: [woocommerce_my_account]

Translation

Sacreva theme is comes with the multi-language support. It means you can translate the site into any language. There are various options to translate the site. You can do it by either editing .pot file, or by using plugins.

Translation with the Poedit

This app provides the easy method to create new translations for any language. Follow the below steos to edit .po file :

Step 1 – Open Poedit.

Step 2 – Choose “New from Po/POT file.

Step 3 – Select the .pot file from wp-content/themes/Sacreva/languages/Sacreva.pot.

Step 4 – Select the new language you want to translate.

Step 5 – Save the file with your language name, prefixed with the theme name. It will generate both a .po and .mo files for your translation.

Step 6 – Place these files into the wp-content/languages/themes/

Using the Plugins

You can easily translate the string using the available translation plugins like WPML and Loco Translate

Here is some documentation for these plugins which will be helpful to create the translation files.

For the loco translate.

https://localise.biz/wordpress/plugin/manual
https://localise.biz/wordpress/plugin/beginners

For the WPML.

Getting Started Guide
WPML Documentation

Source & Credits